What are Tags in SellerApp Dashboard, And How Can You Use Them?
Tags are a powerful new feature on the SellerApp Dashboard that allows you to segment and filter your products and keywords easily.
By creating tags, you can categorize and organize your product and keyword data, making it simpler to navigate and analyze.
In this help article, we will guide you through the process of using tags effectively on the SellerApp Dashboard, along with some use cases to demonstrate their value.
On This Page
- Types of Tags
- How to Create a Tag on SellerApp Dashboard
- How to Manage Tags
- How to Filter Keywords/Products by Tags
- Different Use Cases of Tags
Types of Tags
You can create primarily two types of tags on the SellerApp Dashboard:
- Keyword Tags: These tags are used for categorizing keywords based on different goals. You can add multiple keywords to a tag and even duplicate tags across different marketplaces.
- Product Tags: Similar to keyword tags, product tags enable you to categorize your products based on different goals.
However, unlike keyword tags, product tags cannot be duplicated across different marketplaces.
How to Create a Tag on SellerApp Dashboard?
Here’s a simple step-by-step instruction to create tags on the SellerApp dashboard:
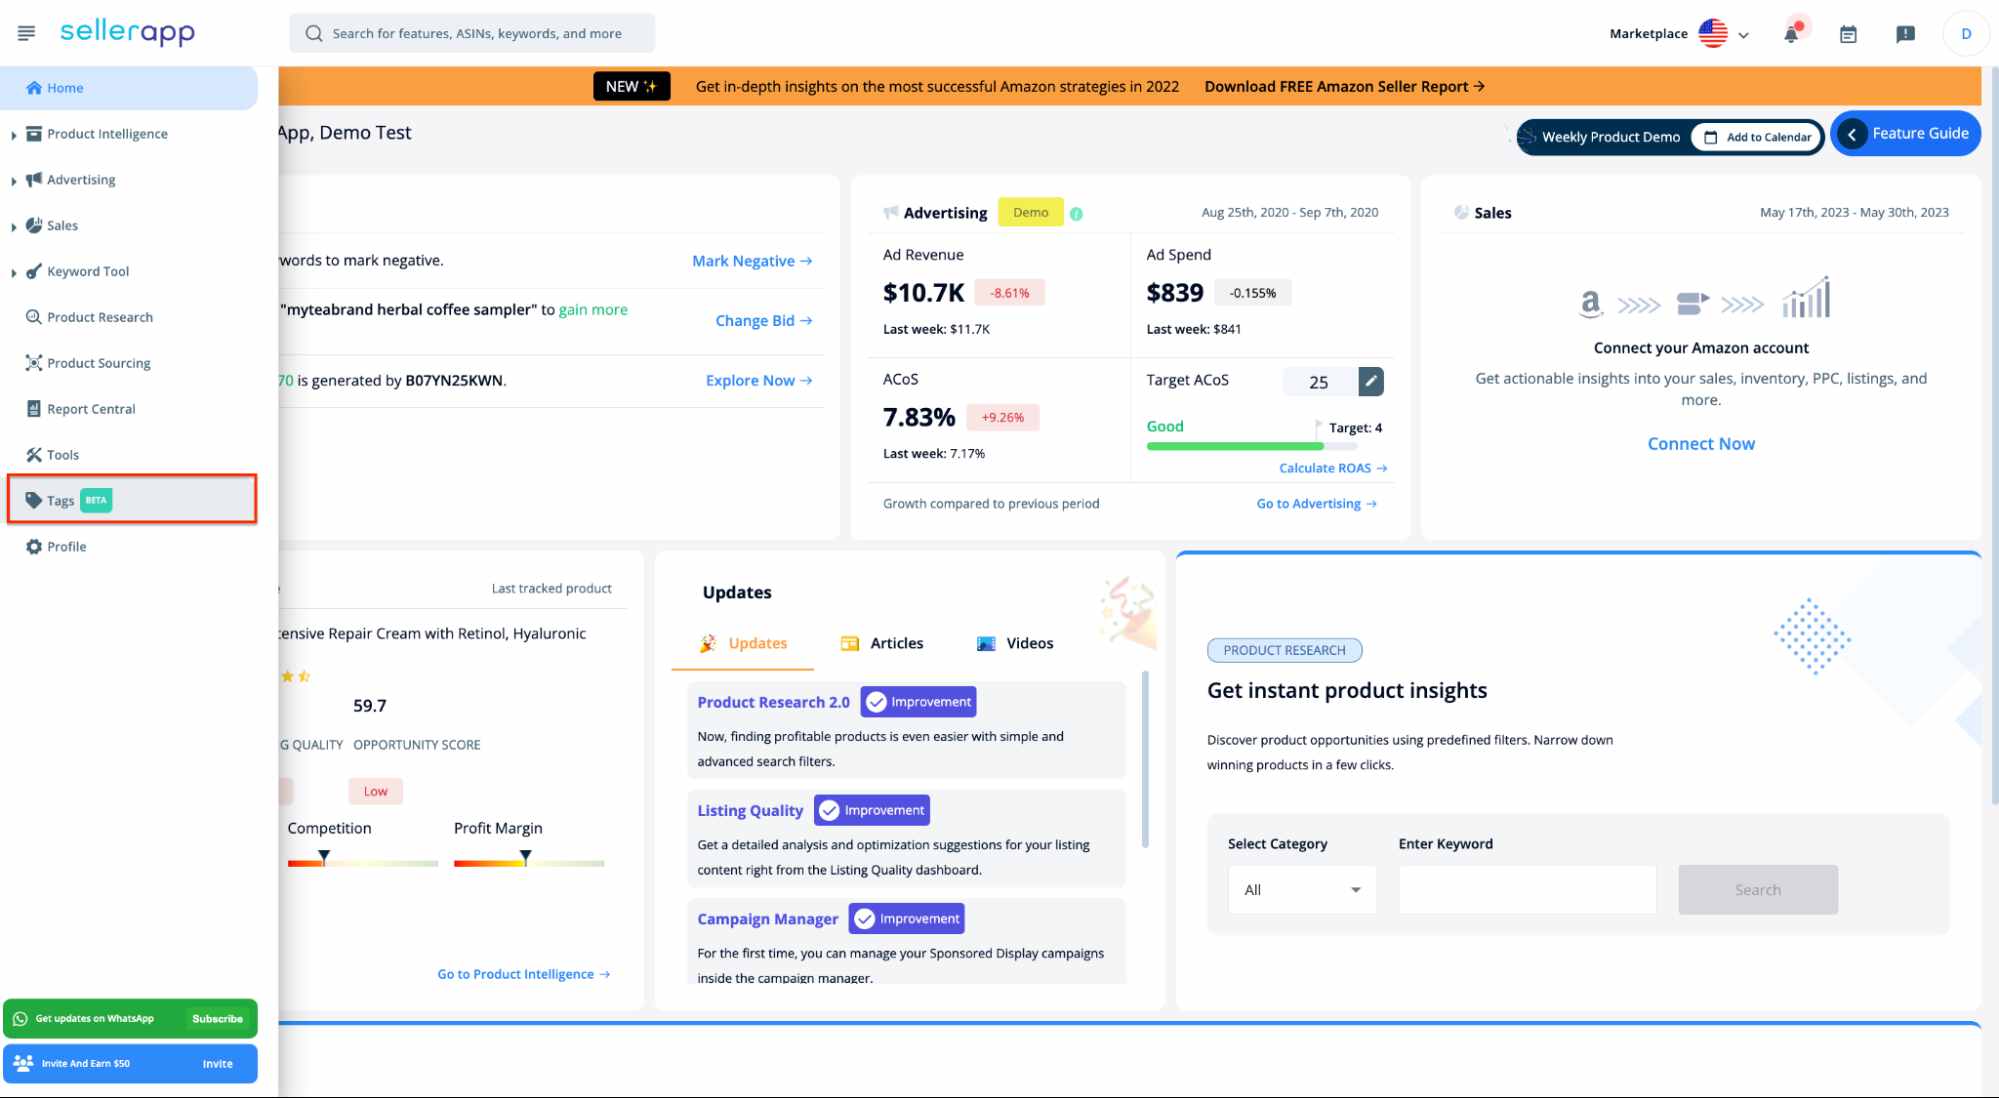
- Log in to the SellerApp Dashboard and navigate to the Tags section from the left sidebar.
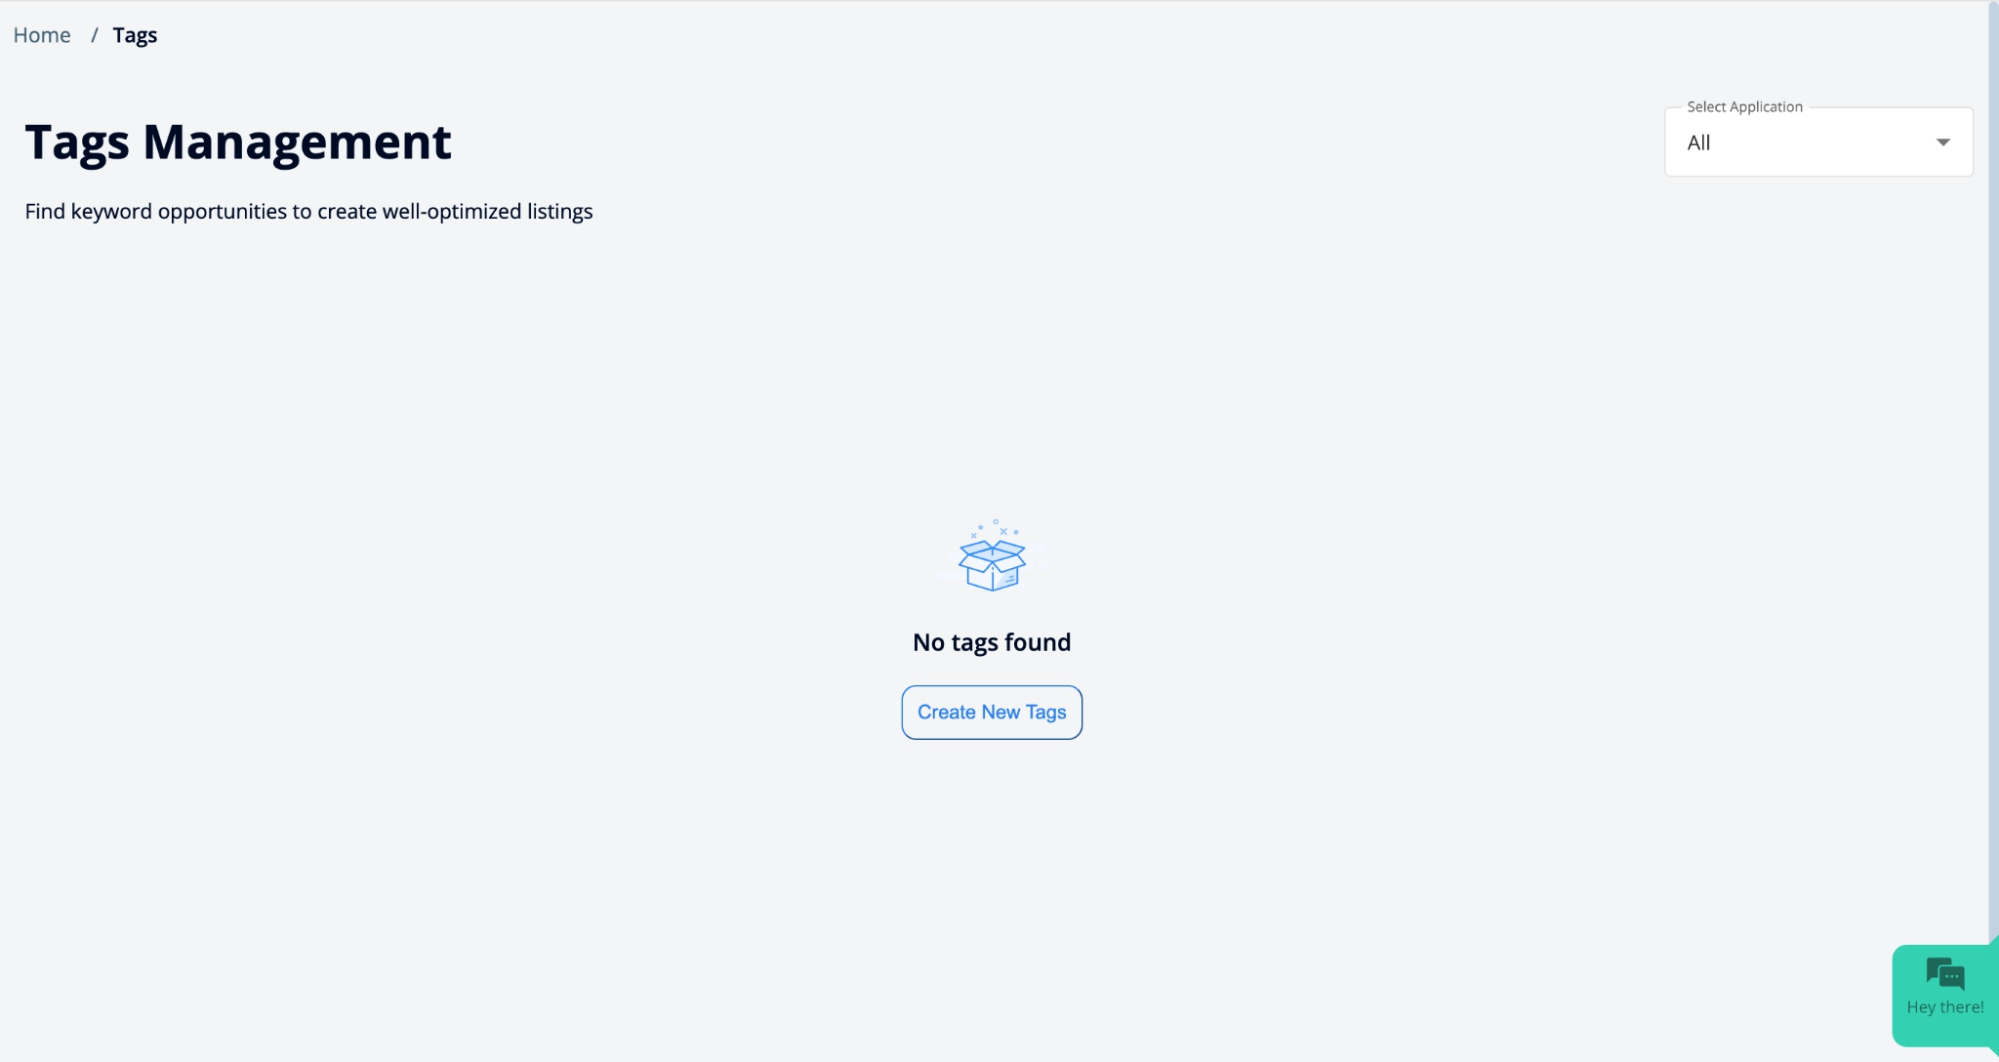
- Click the “Create New Tags” button in the Tags section.
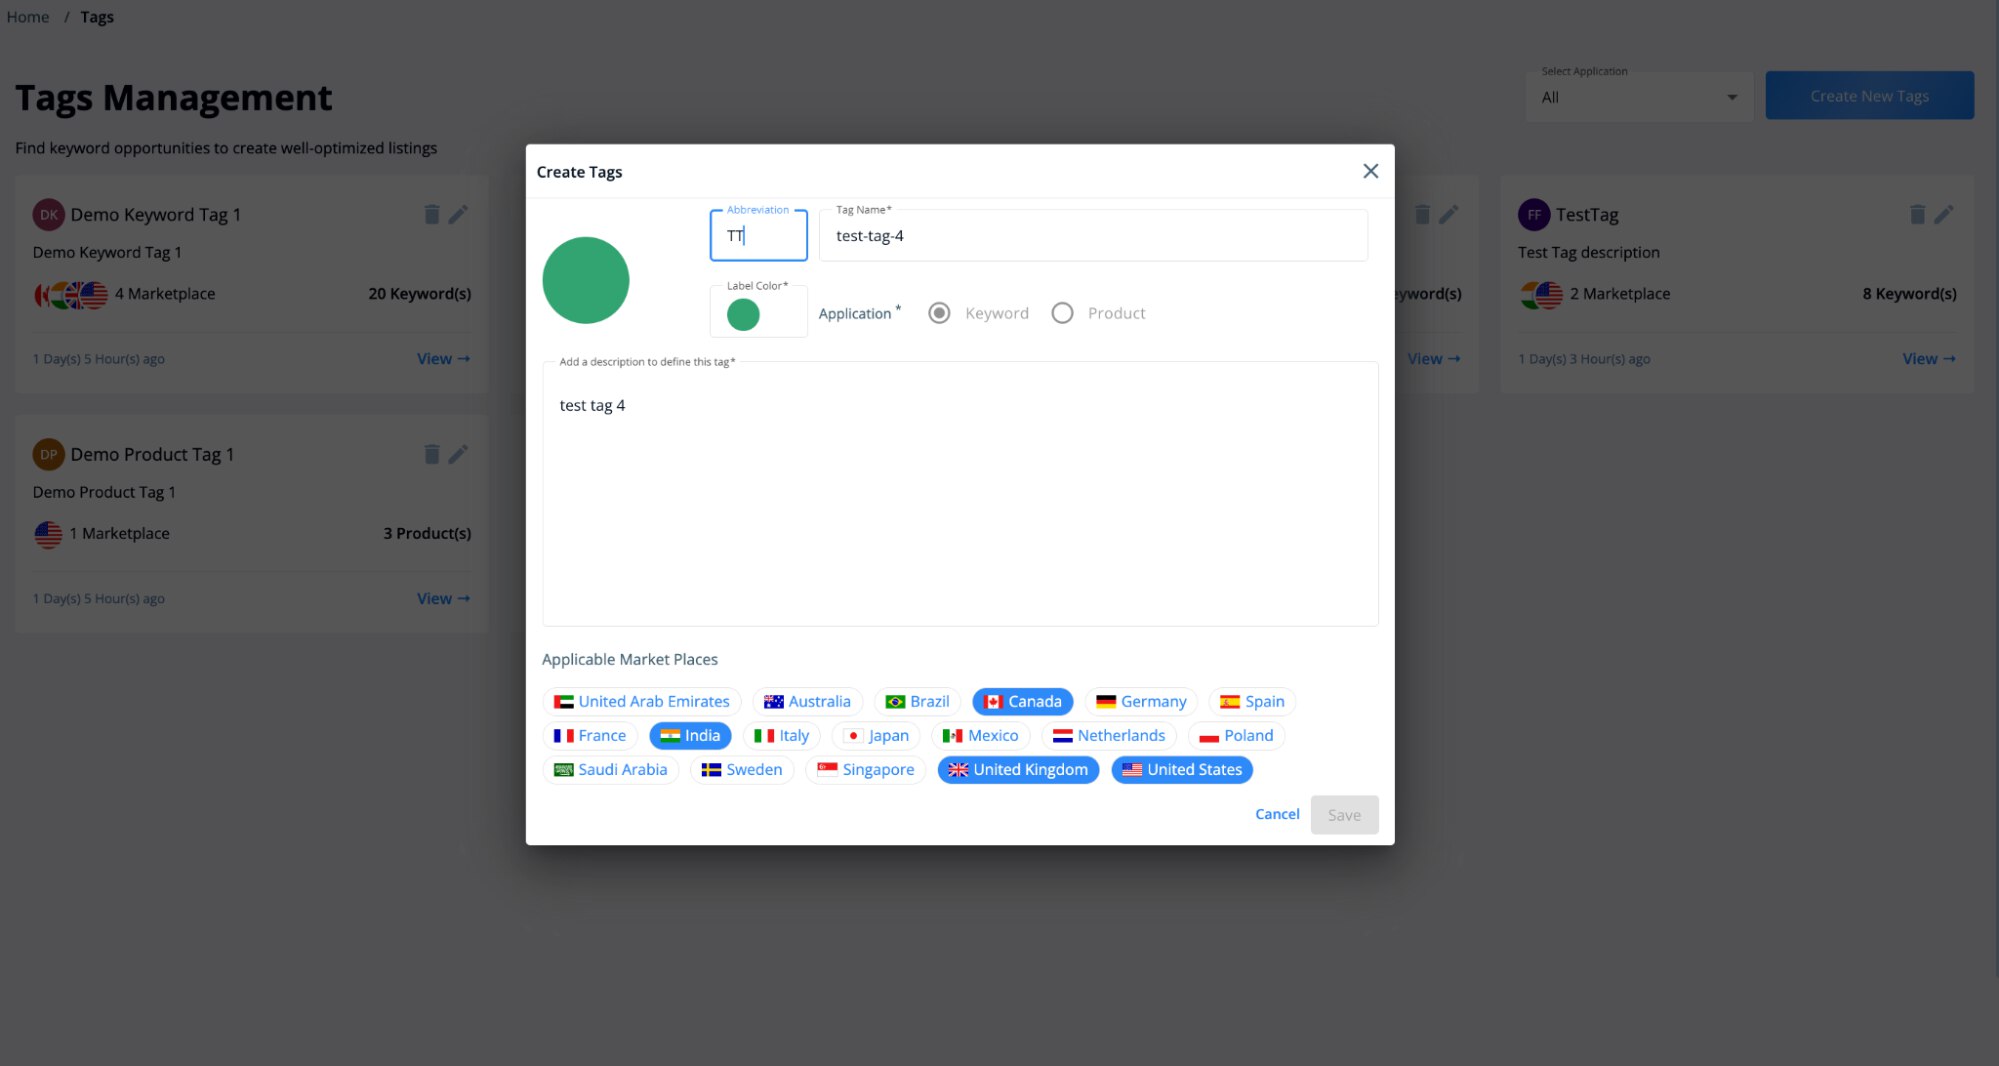
- In the pop-up menu that appears, provide the following details for your tag:
- Add an Abbreviation: Enter a two-letter abbreviation for the tag, making it easy to recognize and identify later.
- Provide a Tag Name: Enter a descriptive name for the tag that clearly represents its purpose or category.
- Choose a Tag Color: Select a color that will be associated with the tag, helping you visually differentiate it from others.
- Specify Tag Type: Decide whether you want to create a keyword tag or a product tag based on your needs.
- Add a Short Description: Optionally, provide a brief description of the tag to offer additional context.
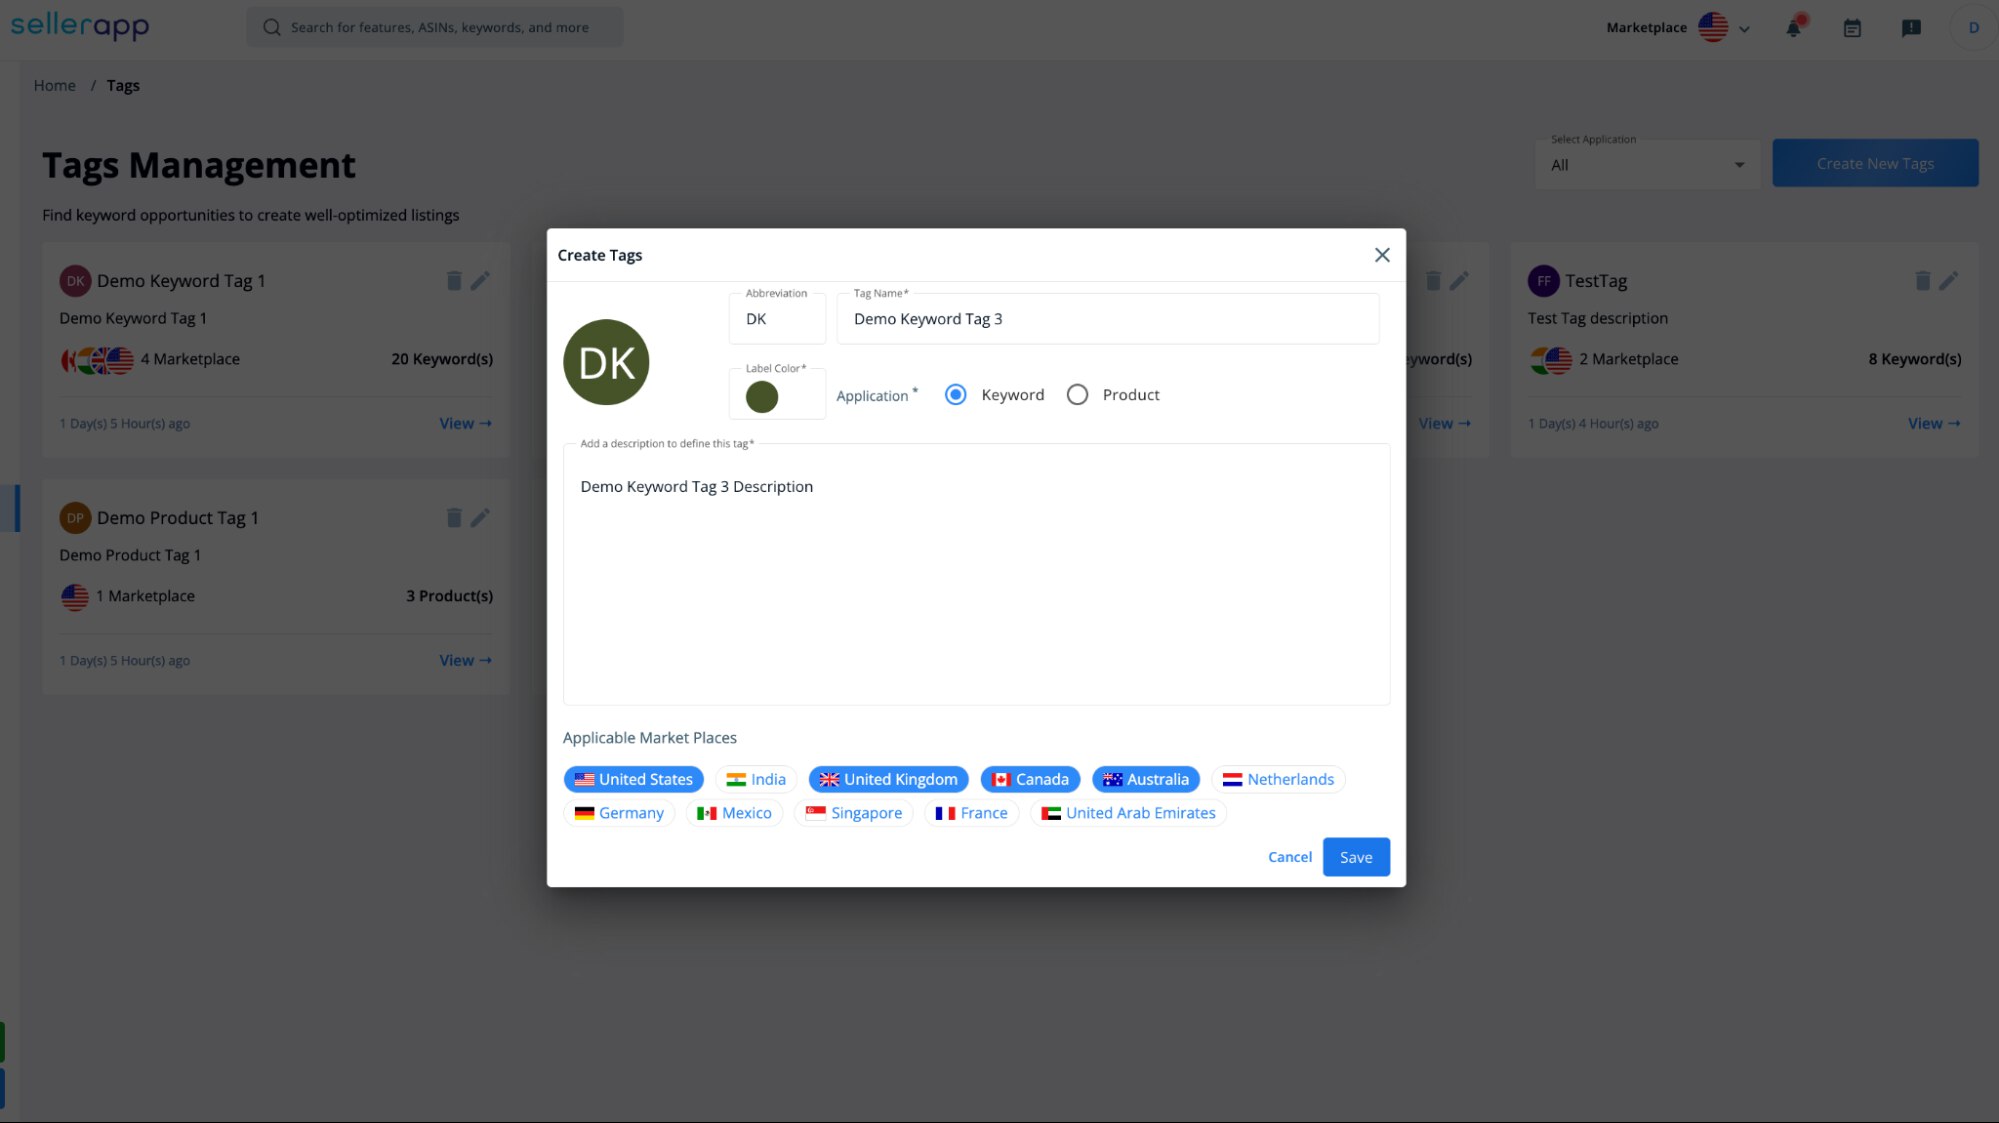
- You can also select the marketplaces where you want to use the keyword tags. Please note that product tags cannot be added to different marketplaces. Click “Save” once done.
How to Add Tags to Products/Keywords
There are two ways you can add tags to the keyword. You can either
- Directly add keywords inside the tag manager dashboard
- Use SellerApp Primary tools, such as Keyword Research, Product Intelligence, or Advertising Dashboard, and add tags from there.
Let’s see how to directly add tags inside the tag manager dashboard:
- Once you save a new tag, it redirects you to the tag dashboard, Here, you can easily add keywords/products to the tag.
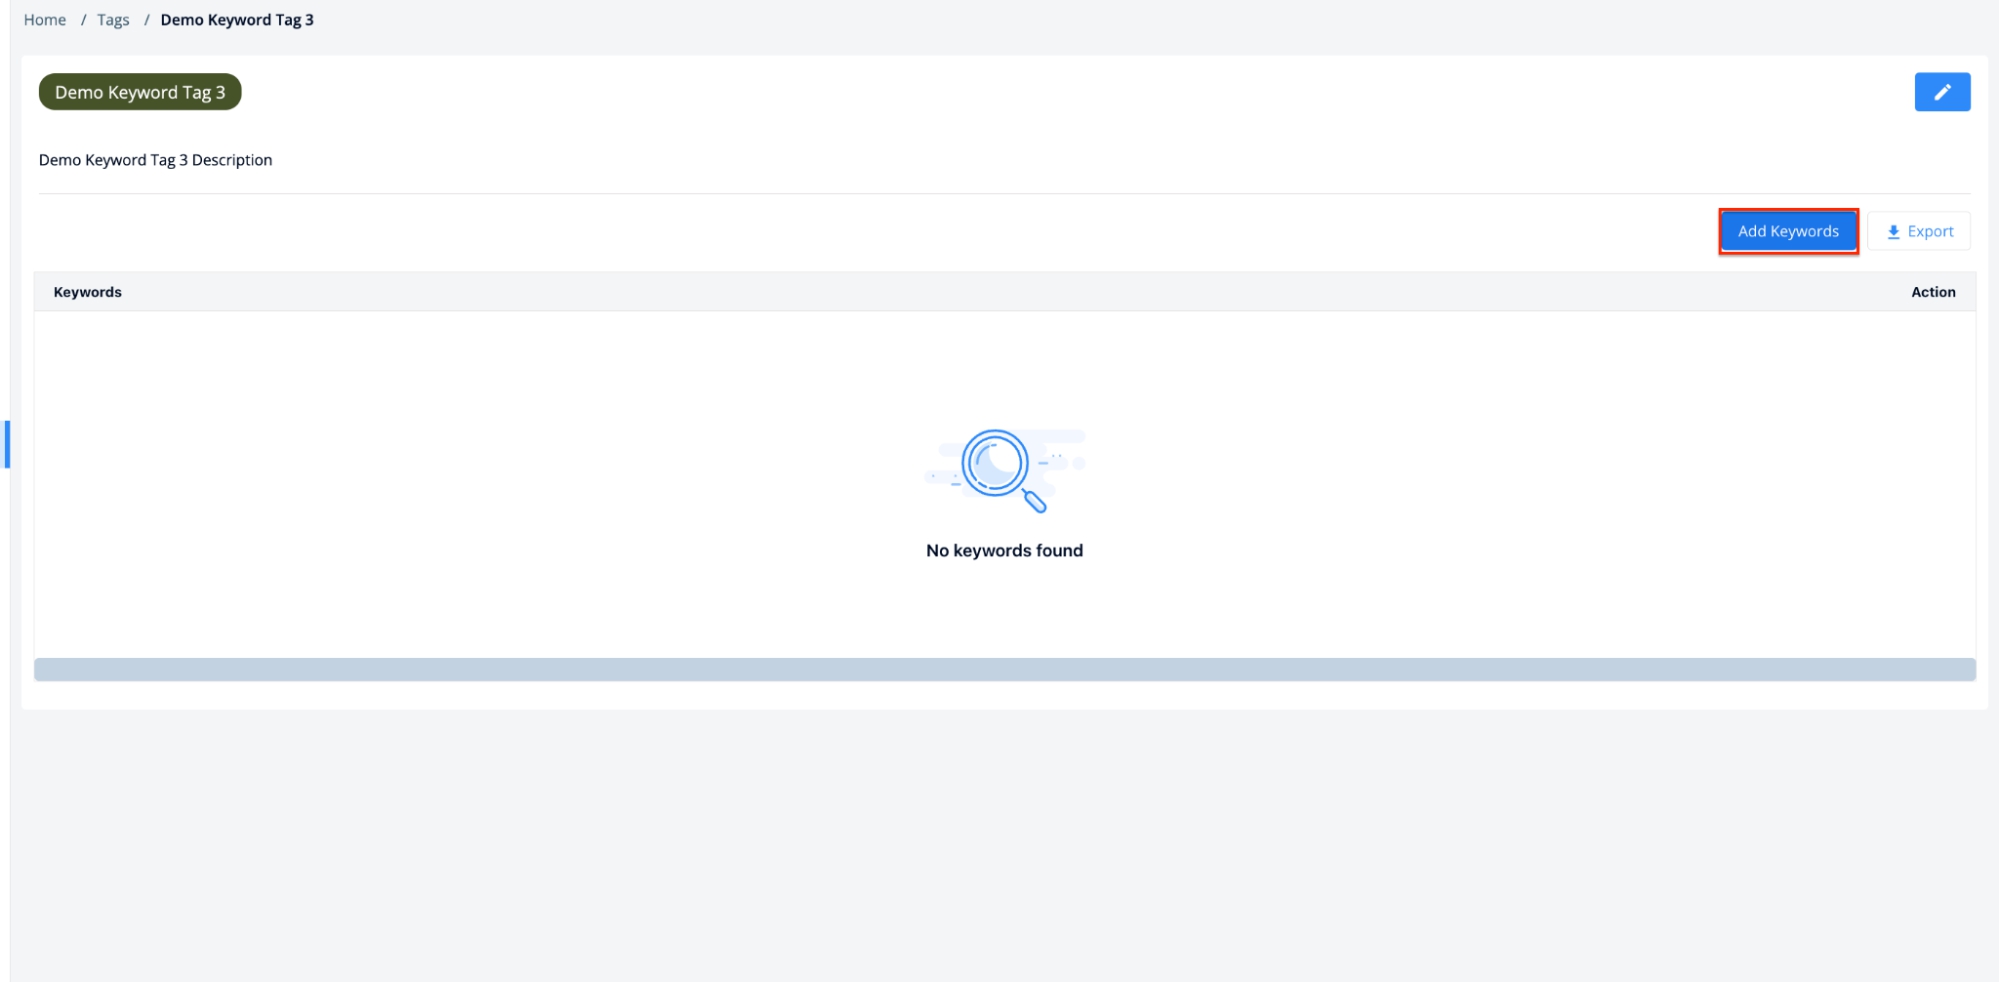
- Click on the “Add Keywords” button on the top right corner. A new pop-up will show up.
- Here enter the keywords you want to associate with the tag. You can separate multiple keywords by using commas or placing each keyword on a new line.
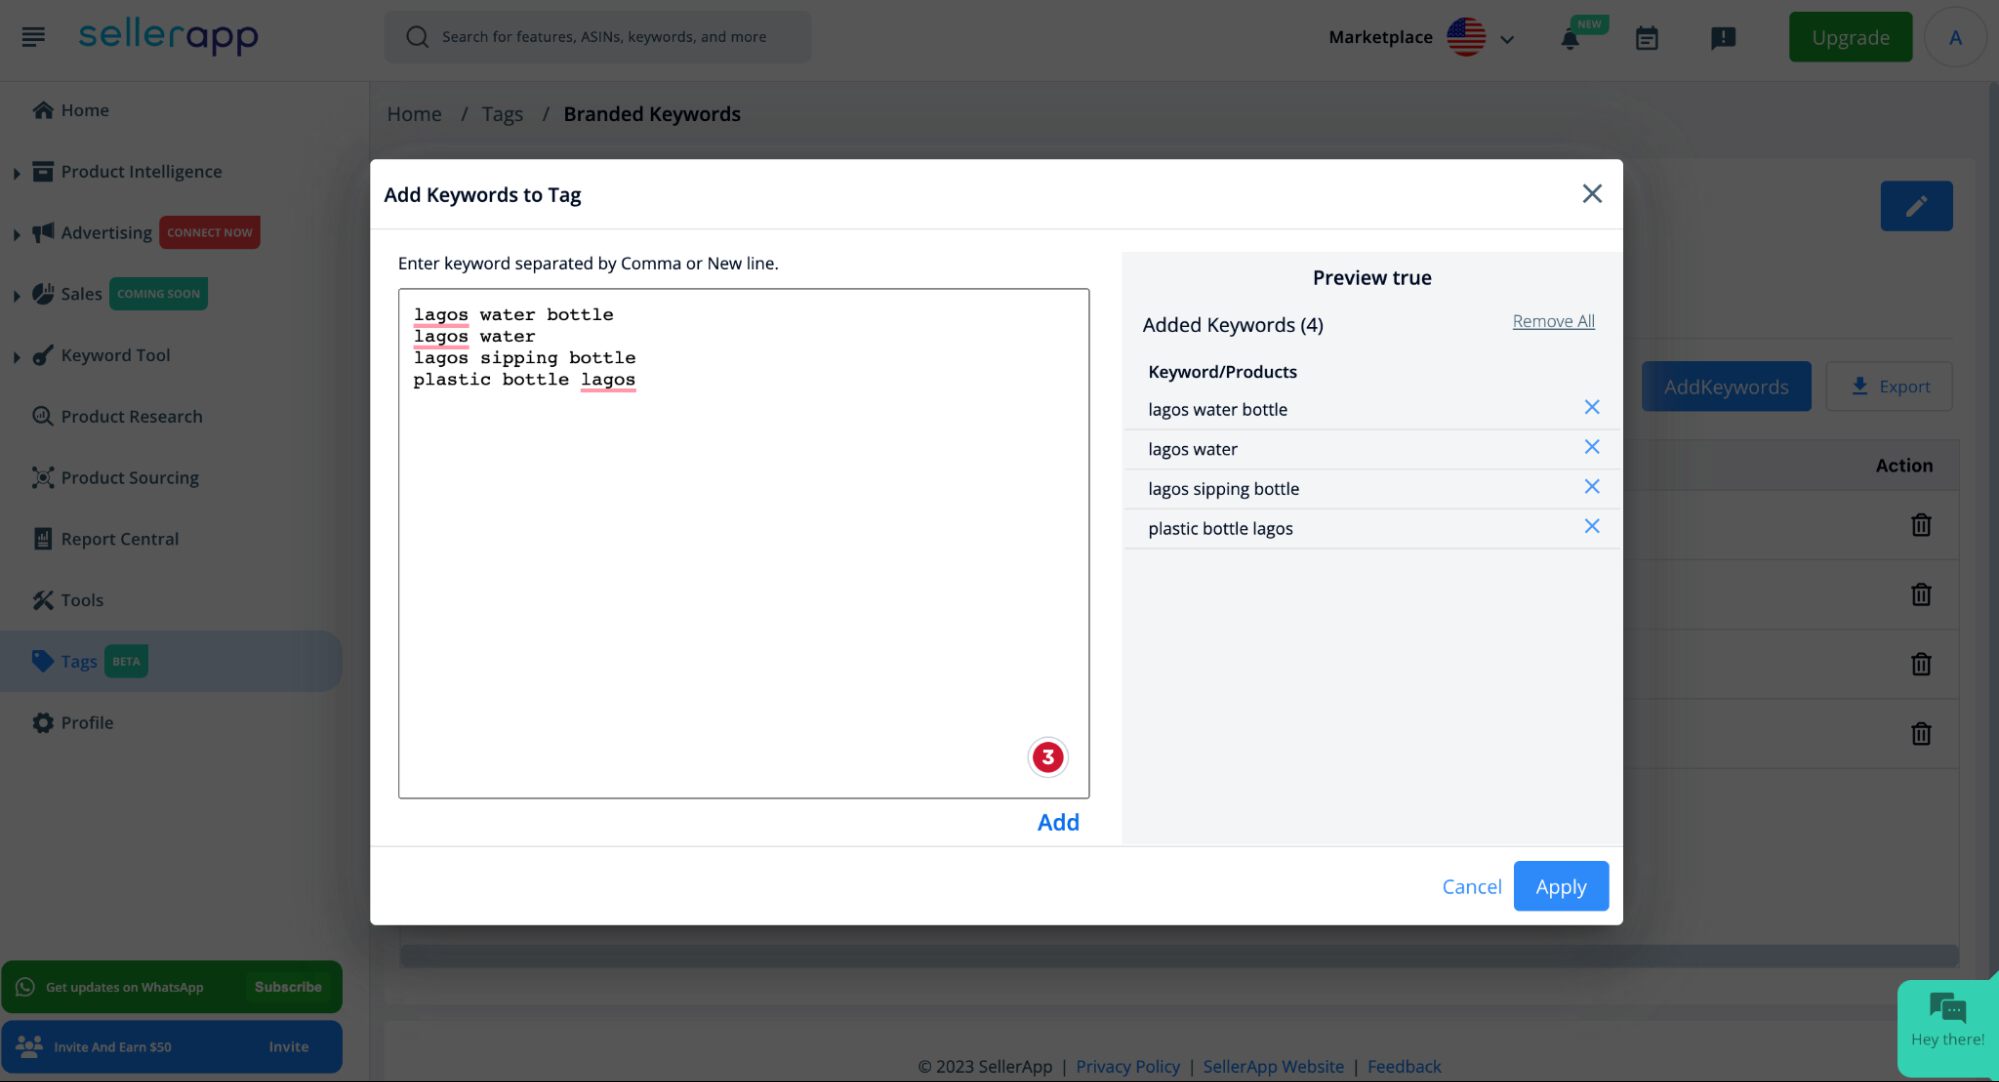
- Once you have entered the keywords, click on the “Add” button followed by the “Apply” button. This will add the keywords under the respective tag.
How To Add Tags From Other SellerApp Features
The new “Tags” is a global feature, which means you can add or remove tags on a product or keyword from anywhere in the SellerApp dashboard.
Here are the features where you can add Tags:
- Keyword Tool
- Keyword Research(Keyword Tag)
- Reverse ASIN Tool (Keyword Tag)
- Product Intelligence (Product Tag)
- Product Keyword (Keyword Tag)
- Keyword Tracking (Keyword Tag)
- Advertising – Insights
- Negative Search Terms (Keyword Tag)
- Positive Search Terms (Keyword Tag)
- Auto to Manual (Keyword Tag)
- Target Improvements (Keyword Tag)
- Bid Optimization (Keyword Tag)
- Positive ASINs (Product Tag)
- Negative ASINs (Product Tag)
- Advertising – Targets & Search Terms
- Search Term Explorer (Keyword Tag)
- Keyword Targets (Keyword Tag)
- ASIN Targets (Product Tag)
- Product Analysis (Product Tag)
To add a tag to a product or a keyword, follow these steps:
- Go to any of the features mentioned above.
- Select a product or a keyword from the list.
- Click on the “Add Tags” button located in the top right corner.
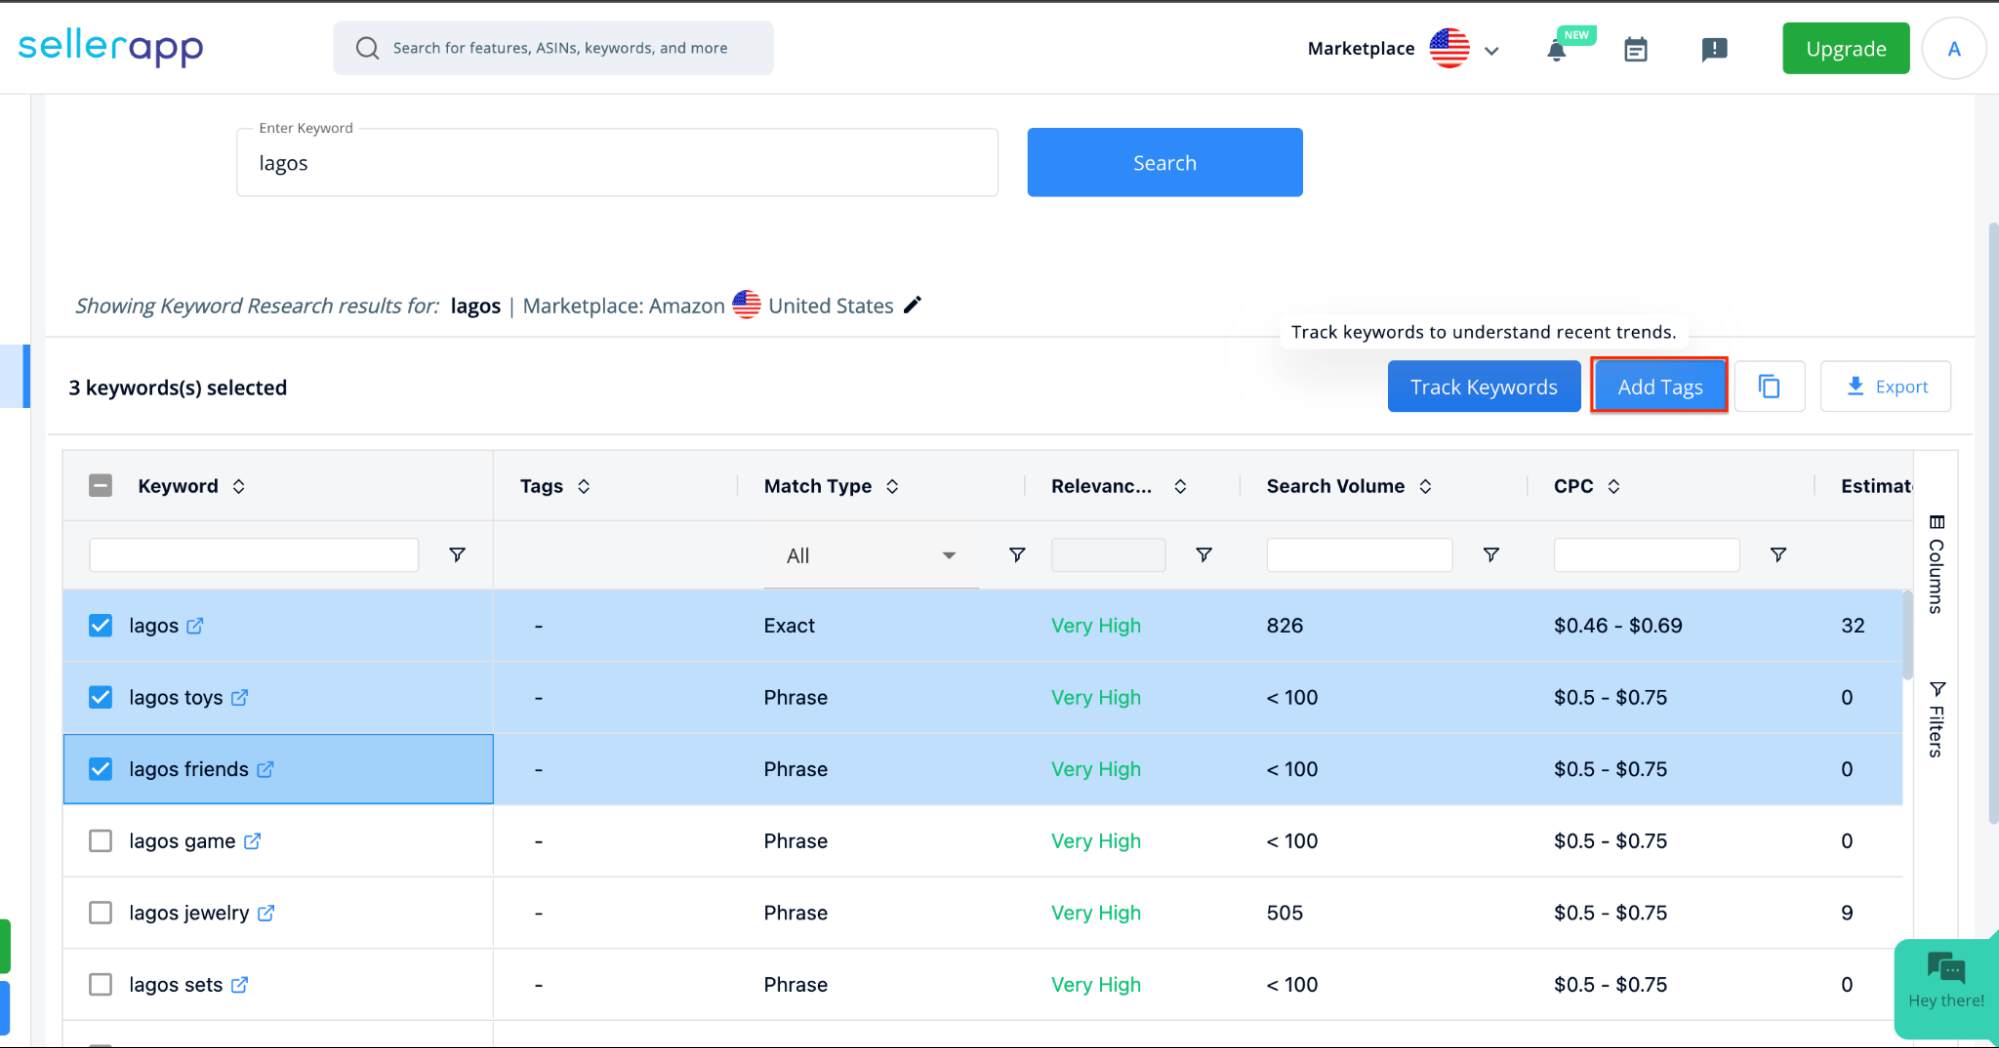
In this popup dashboard, choose the tag for each keyword, click the “Plus” sign, and then click “Save” to save the tags.
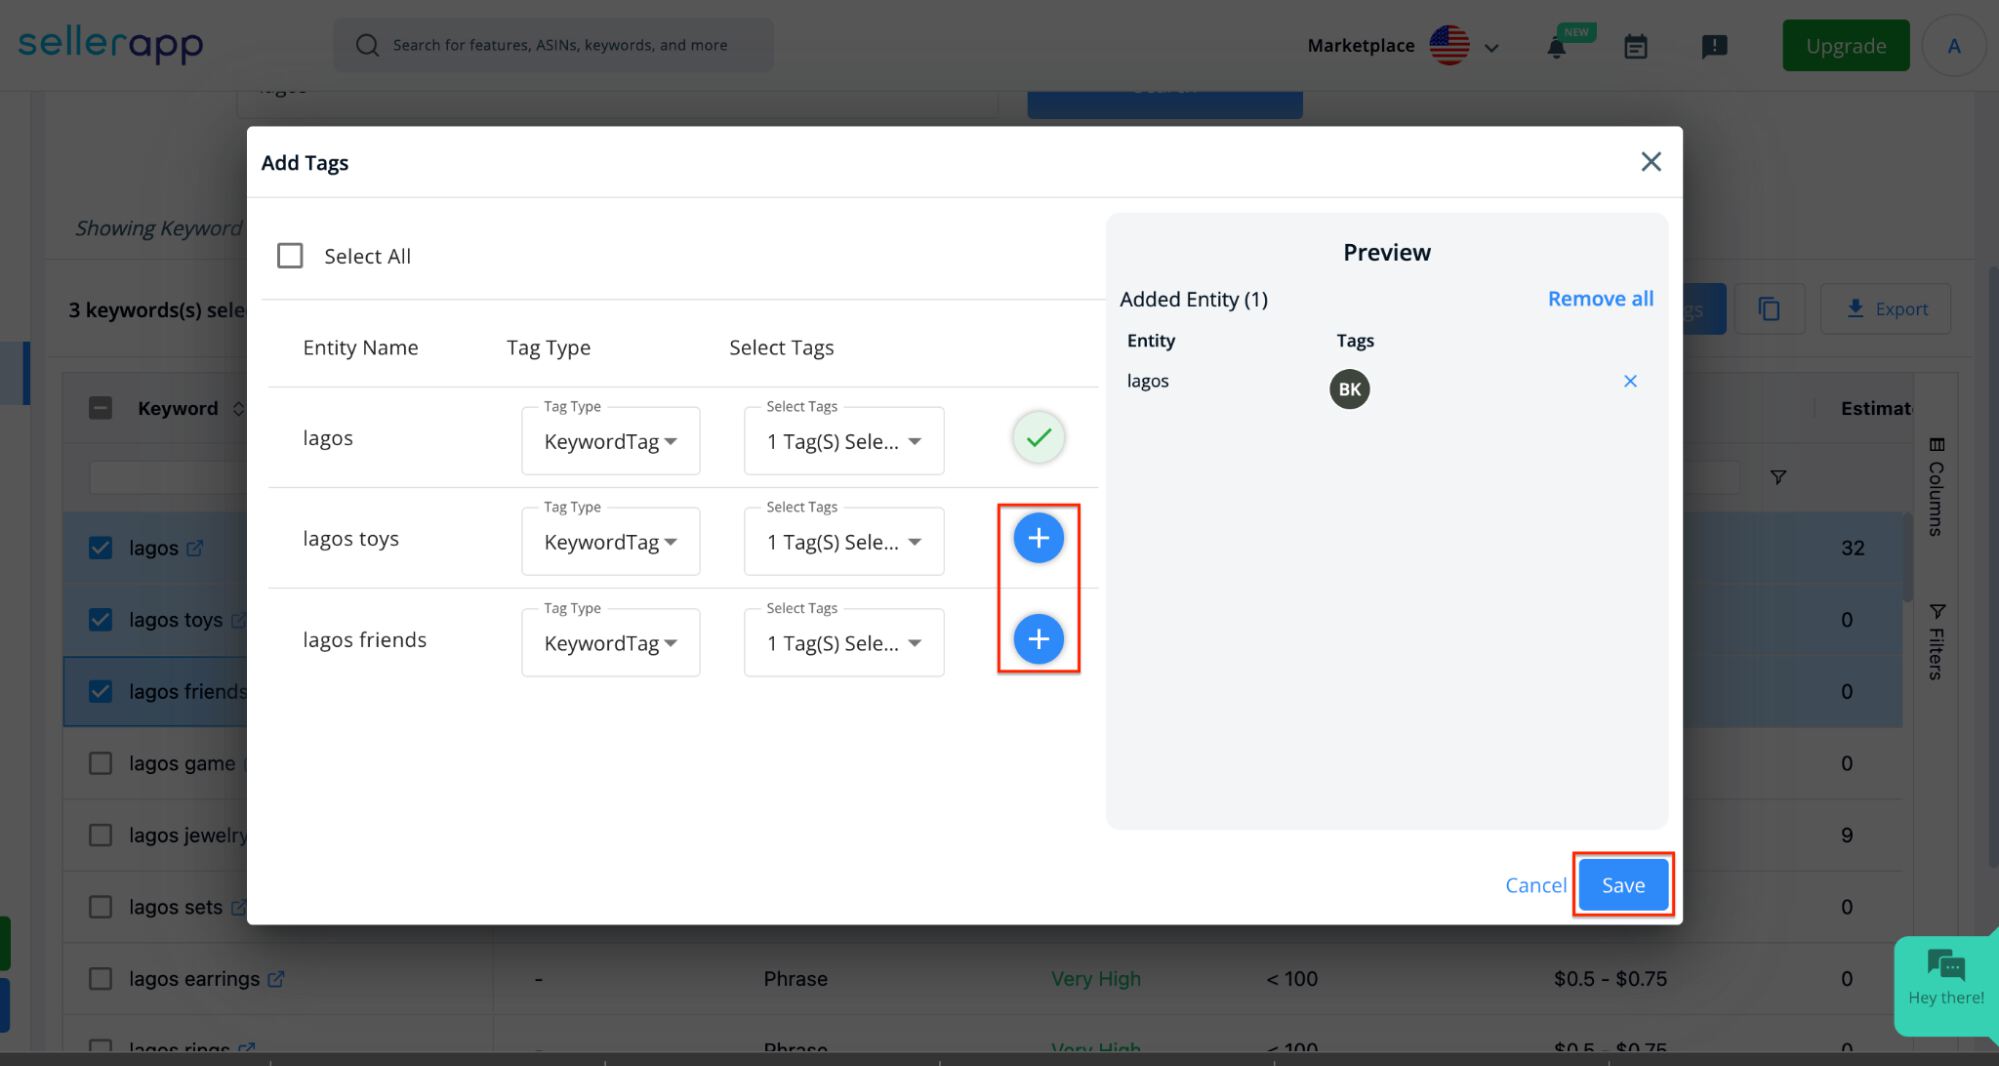
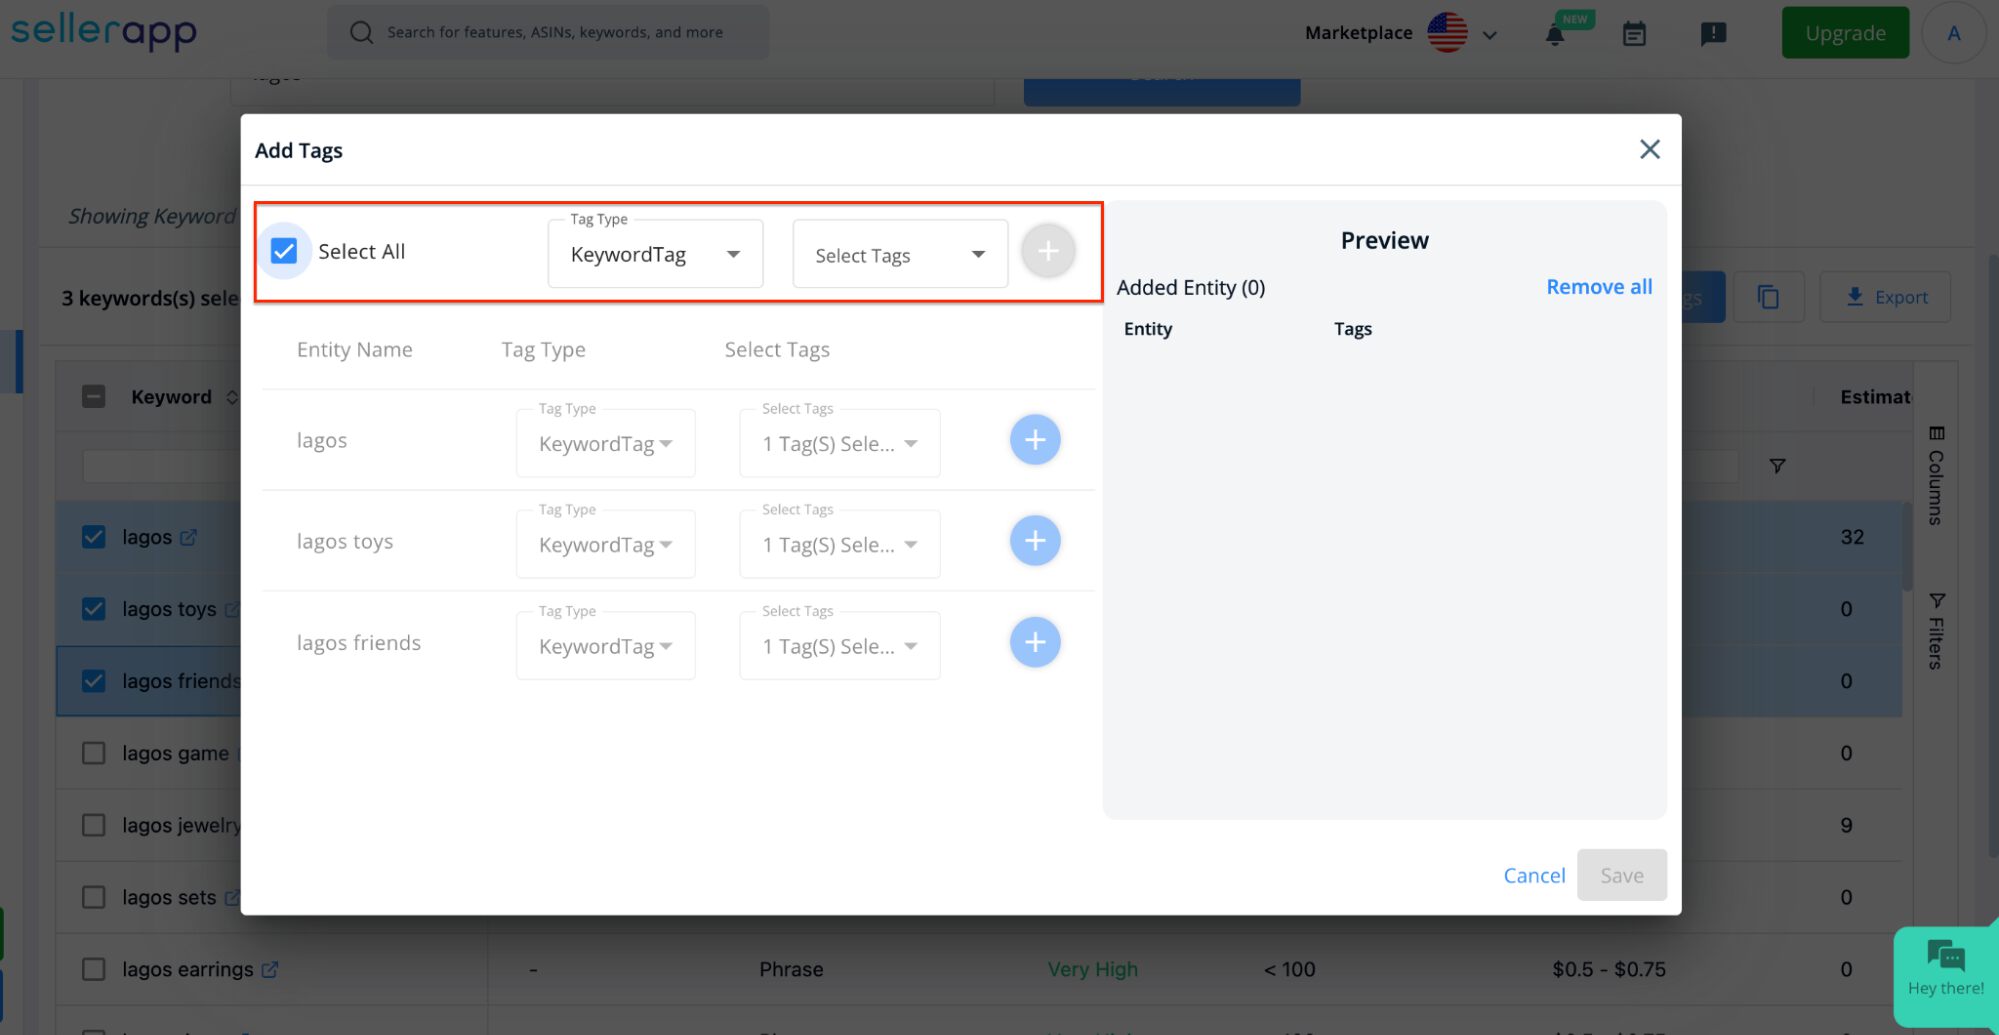
Click “Save” to apply the tags to the selected products or keywords. Alternatively, you can tag keywords in bulk by clicking on the “Select All” button.
How to Manage Tags on SellerApp Dashboard
Once you have tagged products or keywords, you can easily manage them in the “Tags” dashboard. Here’s how:
- Access the Tag Management dashboard from the left sidebar of the SellerApp Dashboard.
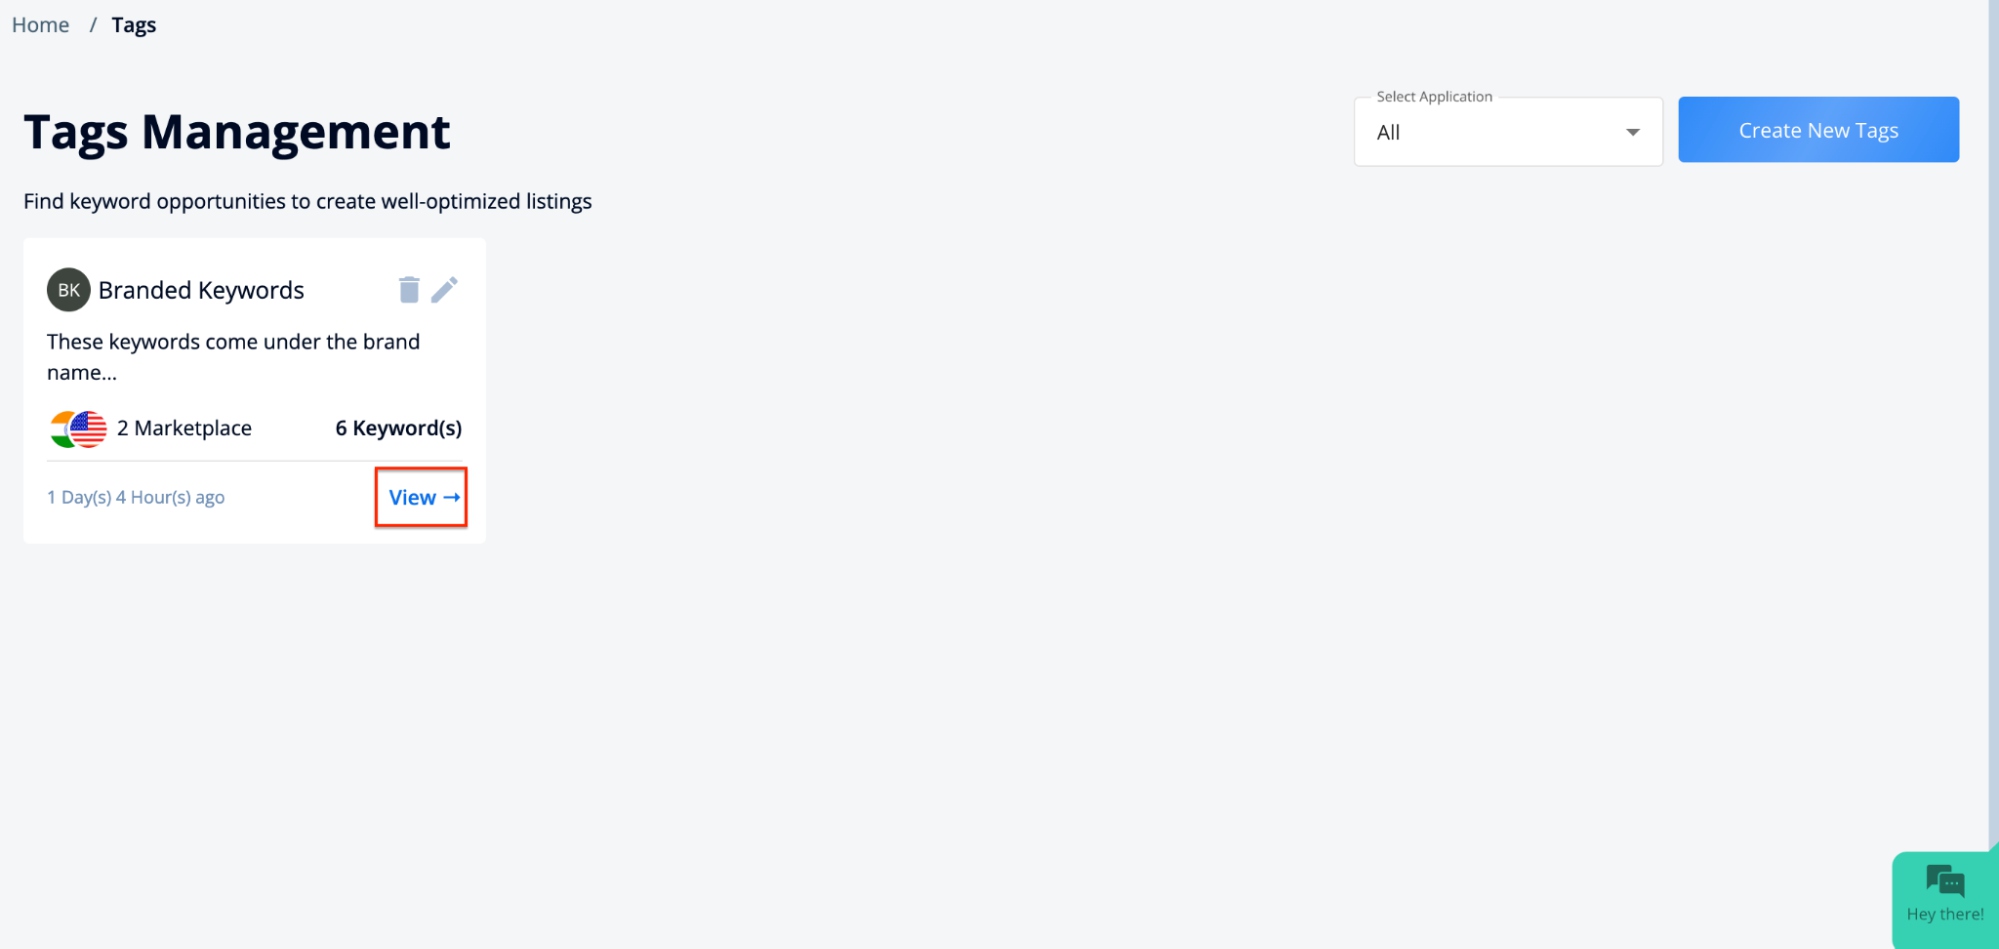
- Click on the “View” button next to the tag you want to review.
- Here, you can see all the keywords and products associated with the tag.
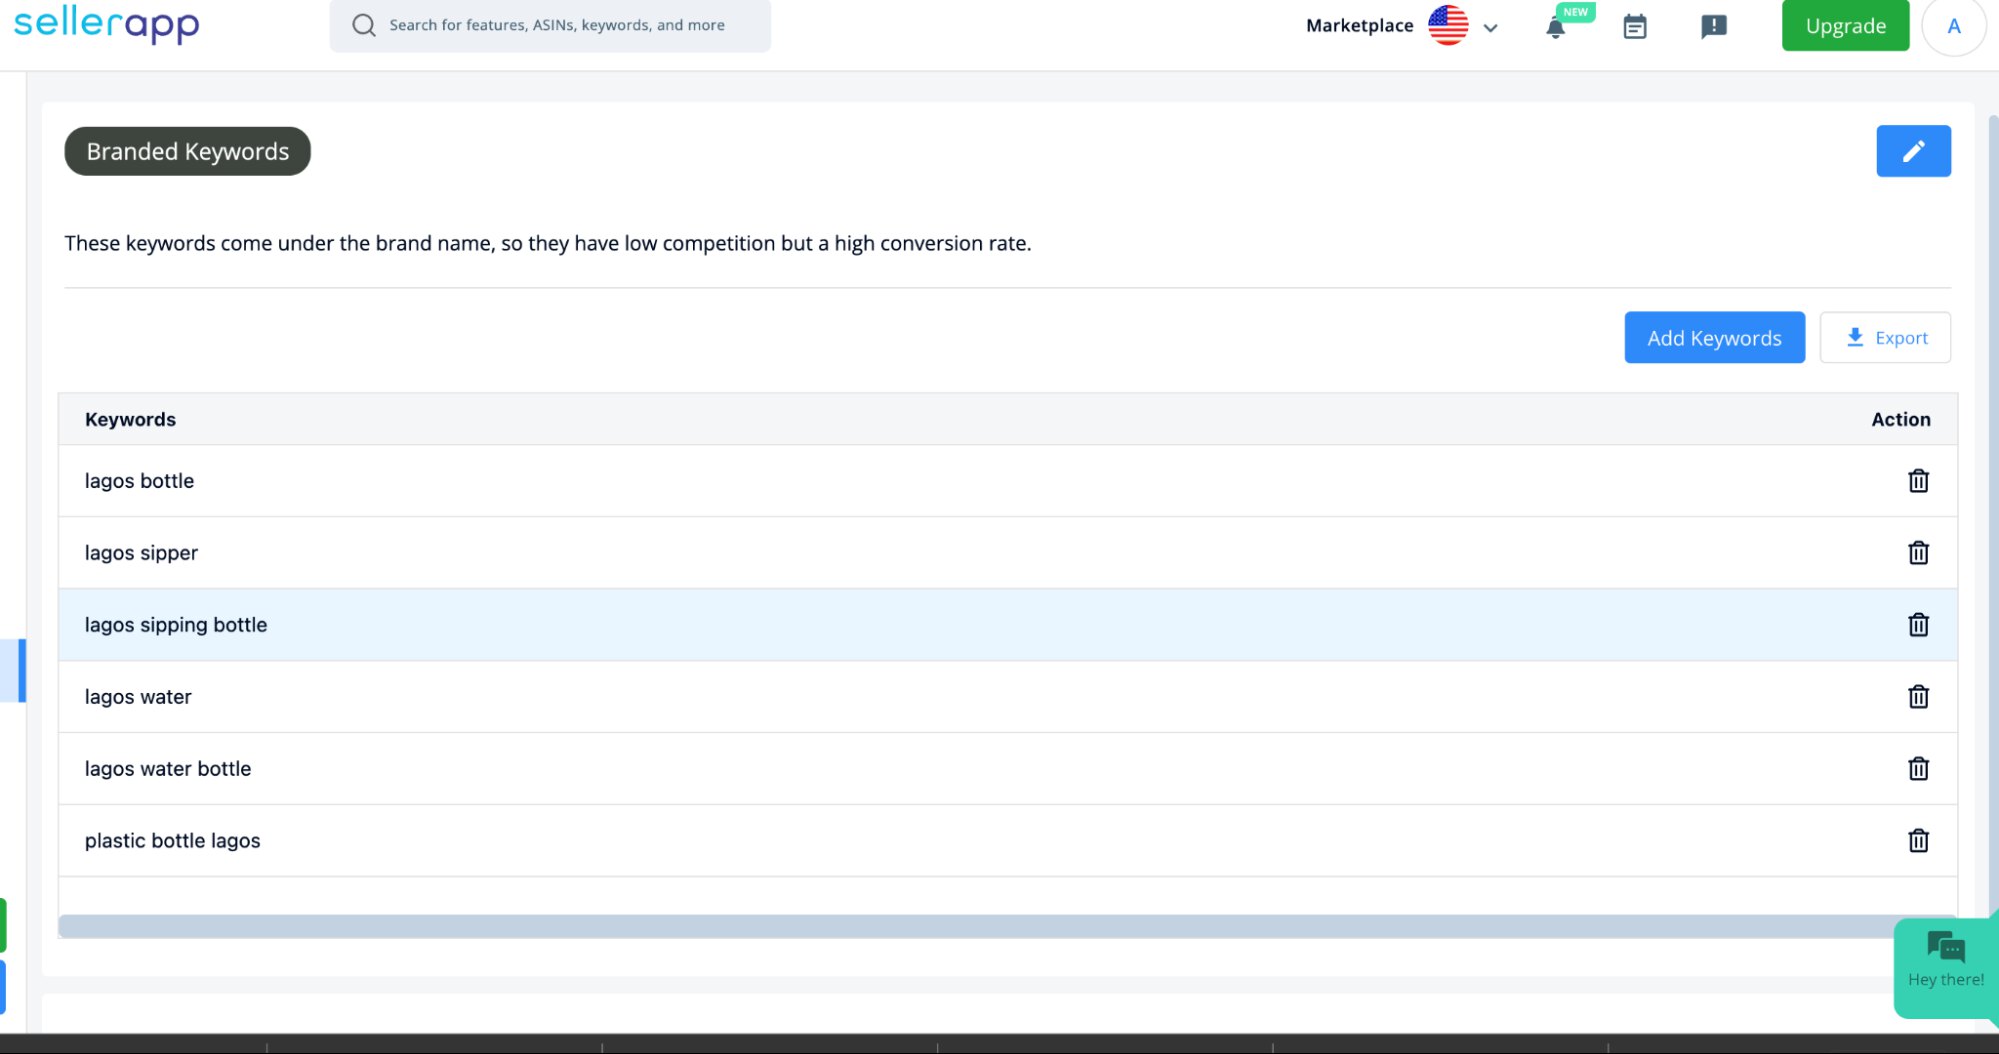
- To remove specific keywords from the tag, click on the “Delete” button. You can also export the list of keywords by clicking on the “Export” button.
- You can also edit a tag by clicking on the “Edit” button. A pop-up dashboard will appear, allowing you to modify the tag information as per your requirements. Click “Save” to apply the changes.
How to Filter Keywords/Products by Tags
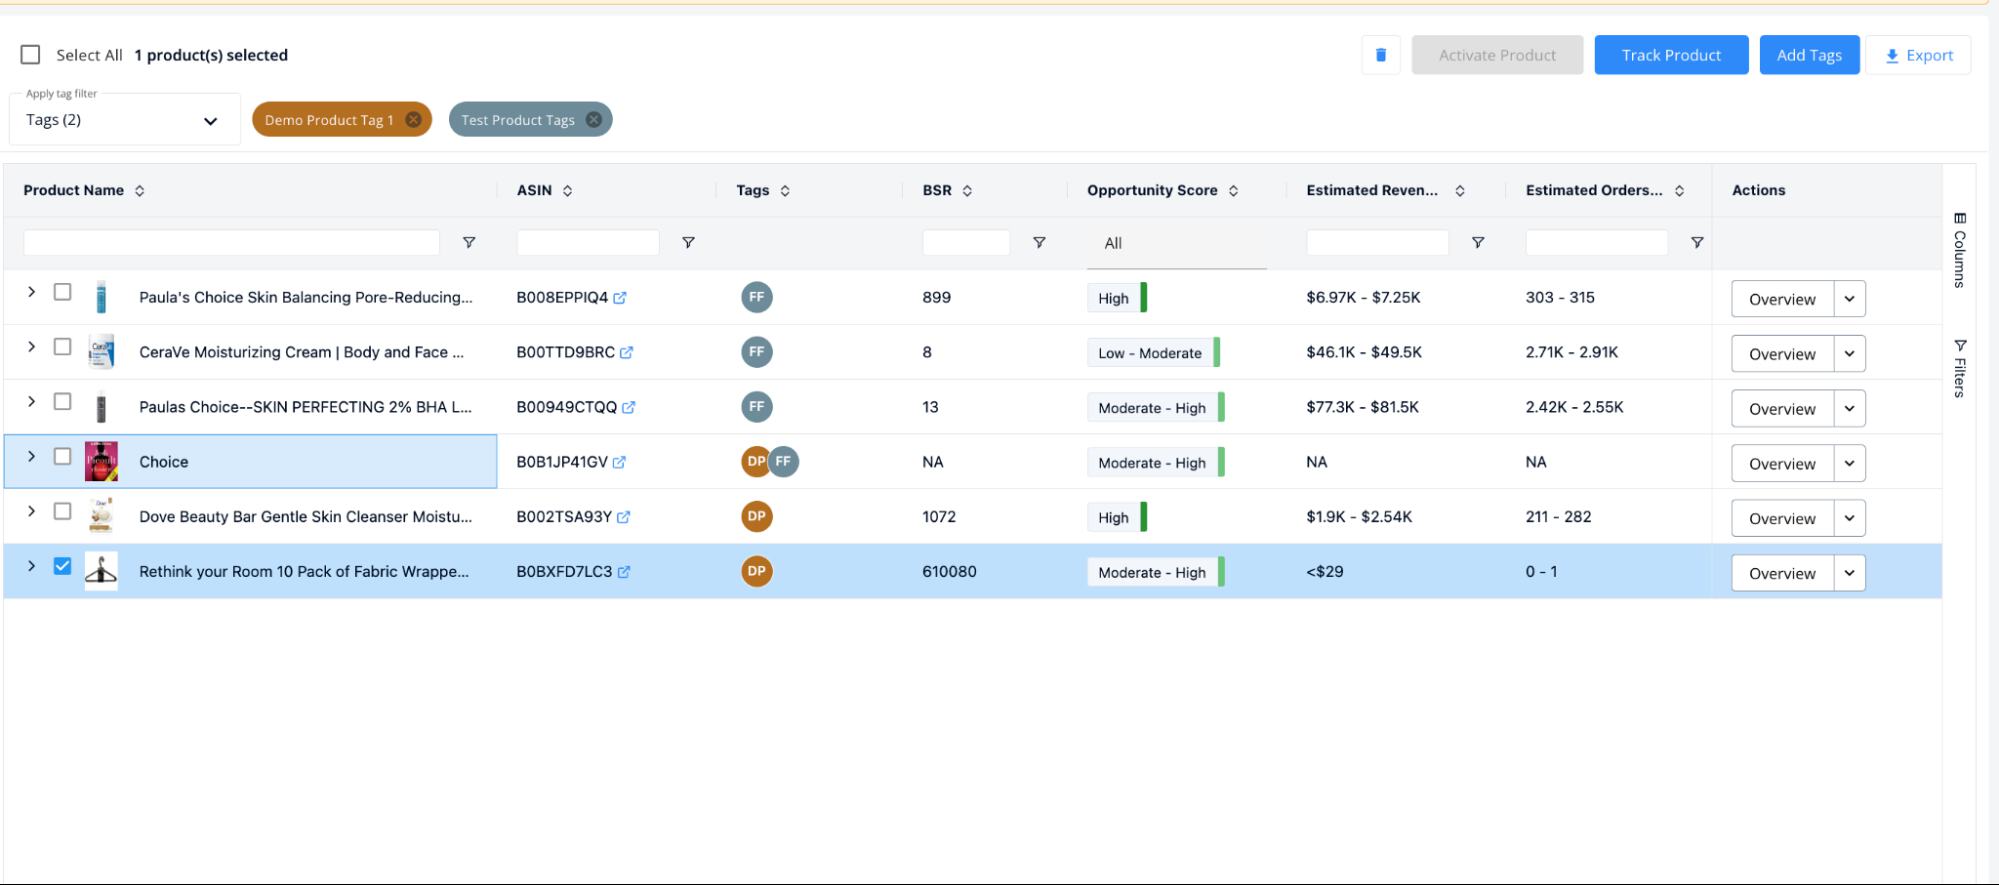
Tags provide an efficient way to filter keywords or products across various dashboards on the SellerApp platform. Follow these steps to apply tag filters:
- Navigate to any SellerApp dashboard (except Keyword Research).
- In the top left corner, click on the “Apply Tag Filter” drop-down menu.
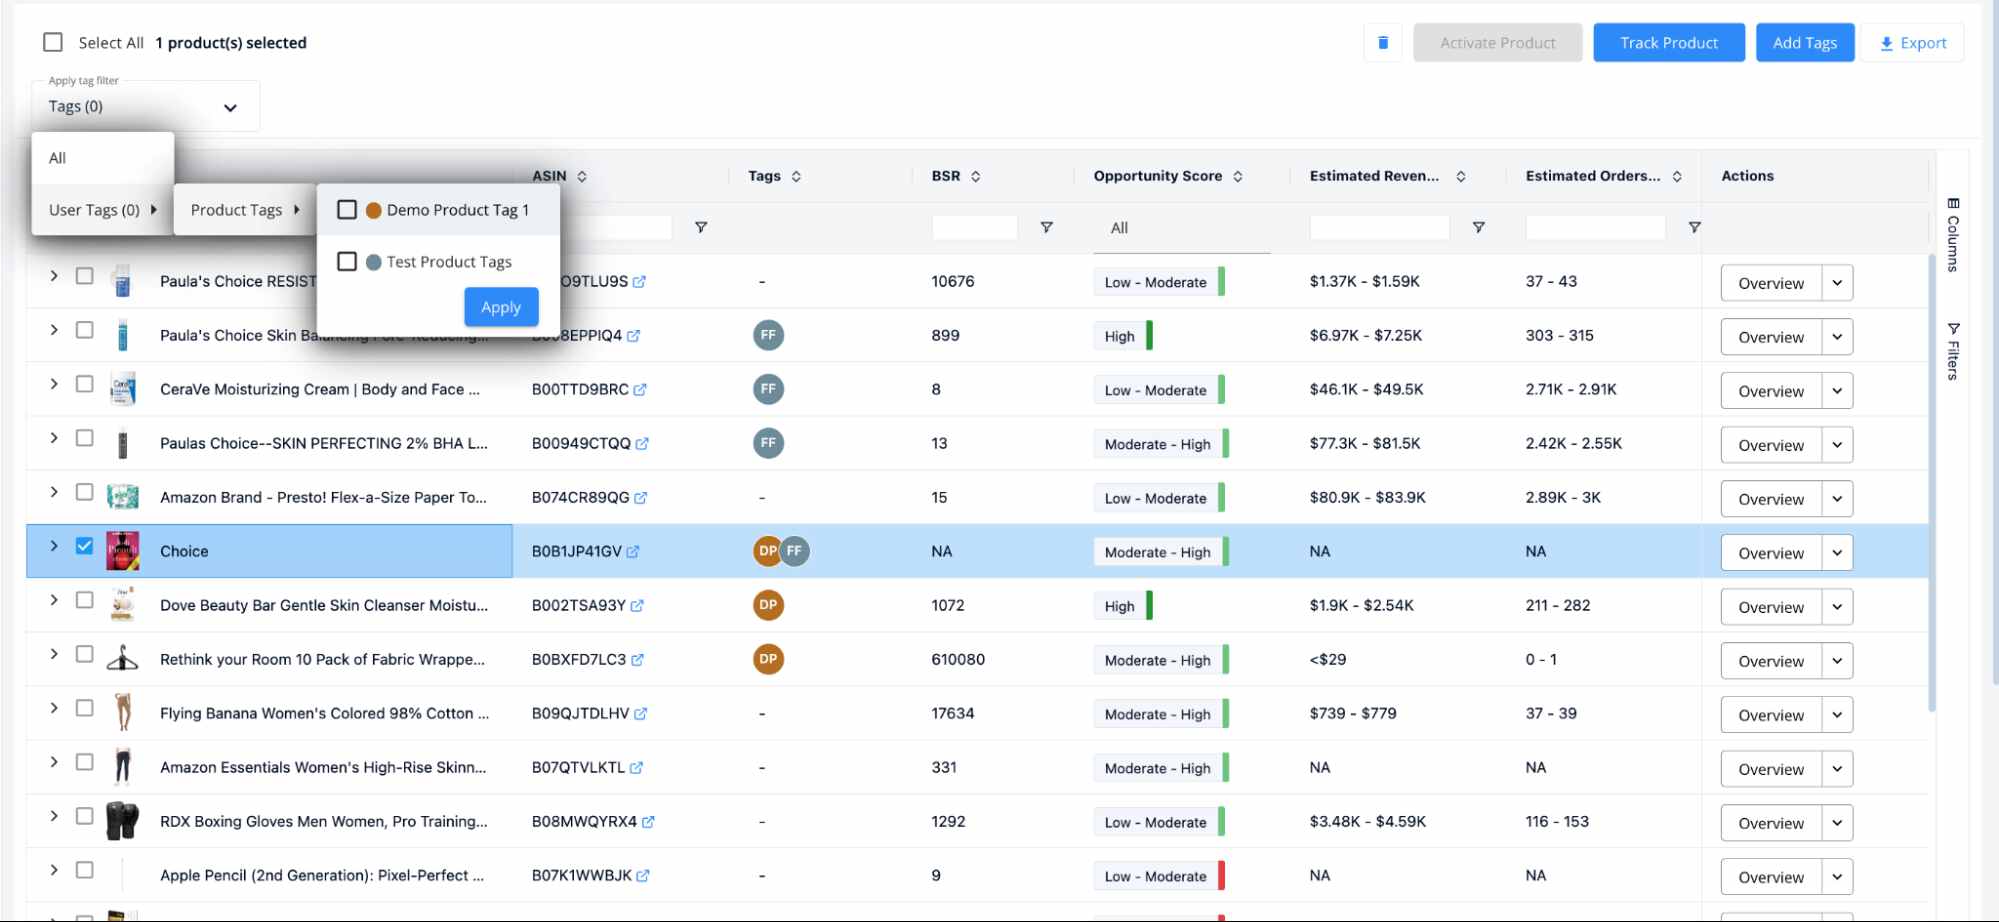
- Select a product or keyword tag from the available options based on your requirement, and click on the “Apply” button to filter the products or keywords accordingly.
Note: You can filter products or keywords based on multiple tags simultaneously, further refining your search results.
Different Use Cases of Tags
Here are some specific use cases for utilizing the Tags feature:
Group Products By:
- Top Selling Products: Create a tag called “Top Sellers” and add your best-performing products to this tag. This helps you easily identify and analyze the products driving the most revenue.
- Newly Launched Products: Use a tag named “New Releases” to categorize your recently launched products. This allows you to track their performance and make adjustments accordingly.
- Product Category: Create tags for each product category. For example, if you have an “Apparel” brand, you can categorize products like “T-shirts,” “Pullovers,” etc. This helps you analyze and compare the performance of products within specific categories.
- Pricing: Use tags like “High-End,” “Mid-Range,” or “Budget” to categorize products based on their price points. This enables you to monitor and optimize pricing strategies for different product segments.
- Seasonal Items: Create tags like “Summer Collection,” “Winter Essentials,” or “Holiday Season” to group products that sell better during specific seasons. This helps you tailor your marketing and inventory strategies accordingly.
- Inventory Levels: Use tags like “Long-Term,” “Slow-Moving,” or “Best Sellers” to categorize products based on their inventory levels and sales performance. This allows you to prioritize restocking and promotional efforts.
Group Keywords By:
- Brand Specific Keywords: Create tags like “Branded” and “Non-Branded” to differentiate keywords related to your brand and generic keywords. This helps you monitor the performance of your brand-specific keywords.
- Gift-Related Keywords: Create a tag called “Gift Ideas” to group keywords that are related to gift-giving occasions. This helps you tailor your marketing and advertising strategies for specific gifting periods.
- Seasonal Keywords: Use tags like “Summer,” “Holiday,” or “Back to School” to categorize keywords that are relevant during specific seasons or events. This allows you to optimize your campaigns and promotions accordingly.
- Organic Ranking Focus: Create a tag called “Organic Ranking” to group keywords for which you are actively trying to improve your organic search rankings. This helps you track and monitor the progress of your organic optimization efforts.
- High Search Volume Keywords: Use a tag named “High Search Volume” to categorize keywords with significant search volumes. This allows you to prioritize your keyword optimization and advertising strategies for these high-potential keywords.
- High Converting Keywords: Create a tag called “High Conversion” to group keywords with higher purchase or conversion rates. This helps you focus on optimizing and scaling your campaigns for these high-performing keywords.
By utilizing tags effectively, you can gain better insights, organize your data, save time, and make informed decisions to optimize your Amazon business.


