How to Create a Branded Amazon Store and Skyrocket Your Sales: Complete Guide
Being one of the most renowned eCommerce retailers with a massive seller and customer base at its marketplace, Amazon is indeed the best place to highlight your unique value proposition. Yes, of course, you can become a seller anytime there, but learning how to create an Amazon Store and set up your products there helps you to take your business to the next level.
Besides Enhanced Brand Content (EBC) & Amazon A+ Content being the norm (which you should have already implemented), your business can reach greater positions with Amazon Stores.
Through Amazon Stores, customers can unveil and learn about more brands as well as their product selections. A “Store” enables a brand to create a dedicated & rich shopping experience and increases engagement.
A brand can enhance its customer experience by enhancing its business-related metrics like traffic, sales, and engagement over time.
So, what exactly is Amazon Store, and how can it help you increase sales?
Let’s understand them in detail.
Quick Guide:
- What Is Amazon Store?
- Who Can Create An Amazon Store?
- Why Should You Create An Amazon Store?
- What Are The Key Features Of the Amazon Store?
- How Do Stores Work?
- How Do Amazon Stores Look Like?
- How To Create An Amazon Store?
- How To Get The Most Out Of An Amazon Store?
- Other Frequently Asked Questions (FAQs)
- Conclusion
What Is Amazon Store?
Amazon’s in-store is one of the key features for brands to drive sales and increase shopper loyalty.
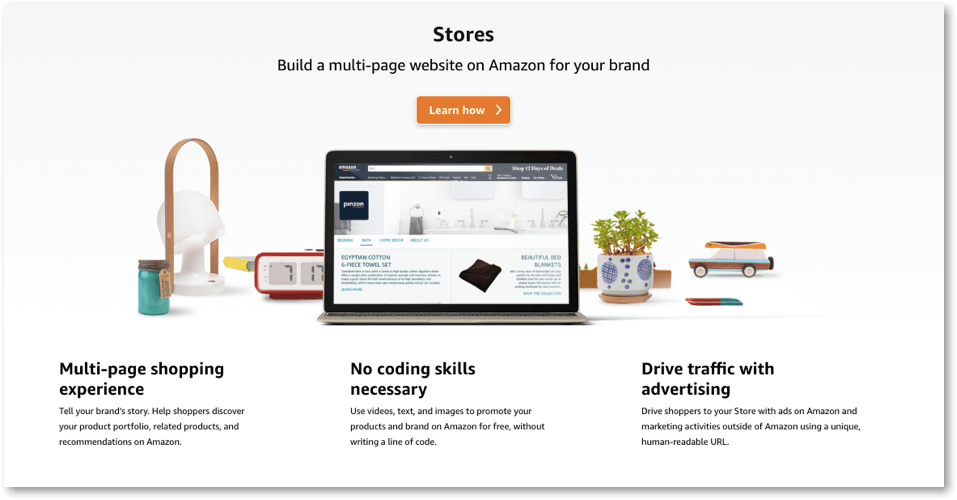
Amazon Stores is the new DIY (Do-It-Yourself) solution, which allows sellers & vendors to set up their own brand stores on Amazon.com. The feature is exclusively designed to provide customers with an immersive and rich virtual shopping experience.

In short, it is a free self-service product, which enables a brand owner to create and design multi-page stores to highlight their products, value proposition, and brands on Amazon.
Note: Setting up an Amazon Store is easy, completely self-service, and absolutely FREE for any Amazon seller or vendor who is a Brand Owner.
Who Can Create An Amazon Store?
To set up an Amazon Store, you should have enrolled in the Amazon Brand Registry program. It is free and available for:
- Sellers
- Agencies
- Vendors
Note that you don’t have to advertise on Amazon to create a store.
Why Should You Create An Amazon Store?
The main purpose of creating an Amazon Store is to drive shopper engagement. Since it is a created destination for buyers to learn about different brands and shop different products in one place, it makes it ideal as all as convenient for them to shop.
A “Store” provides an excellent brand-centric shopping experience on both Mobile and Desktop platforms.
Amazon Store elevates the experience of shoppers by:
- Giving an enhanced mobile experience.
- Capitalizing on both internal and external sources of traffic.
- Boosting organic rankings on Amazon SERPs (Search Engine Page Results) and thereby, increasing the sales volume.
- Providing an opportunity to popularize your brand to newer audiences.
- Promoting your products to all the preexisting customers.
Amazon Stores is a perfect way to build customizable pages by showcasing a small or single group of items. You can include a slideshow containing photos, texts, videos, and other types of content. This makes it great for new product launches.
Why Are The Key Features Of Amazon Store?
Key features:
- Unique Design: With Stores, you can pick your design from a wide range of templates with different store layouts as well as customizable features just to ensure that your brand looks its “best” to the shoppers.
- Custom Curation: You can feature or highlight a handpicked/dynamic collection of products with optional and impressive multimedia content to improve the shopping experience of your customers.
- Integrated Promotions: You are free to use its inbuilt social features such as social sharing buttons, connected with various promotional extensions like Headline Search Ads. This drives store awareness & traffic.
- Multi-Pages: Amazon Stores lets you create multiple pages (3 levels maximum) for showcasing your brand as well as products. You can customize the shopping experience depending on what your business needs.
- Self-service Builder: With Stores, you get a simple and intuitive builder, which inspires you to set up as engaging as it can be. The templates are simple and easy to use. They are available for free and can be simplified to create an extraordinary experience.
- Rich Media: It helps in elevating the shopping experience by including rich media & content like images and text. A vendor can create his or her Amazon Store just by logging in to his or her Amazon Marketing Service account and select the Stores tab.
- No coding required: Since it has a set of templates to choose from, you don’t have to know coding or programming to create one. You can use text, images, and videos to promote your brand and items for free on Amazon without writing a line of code.
How Do Stores Work?
The way Amazon Stores work is not rocket science. It is simple and easily understandable.
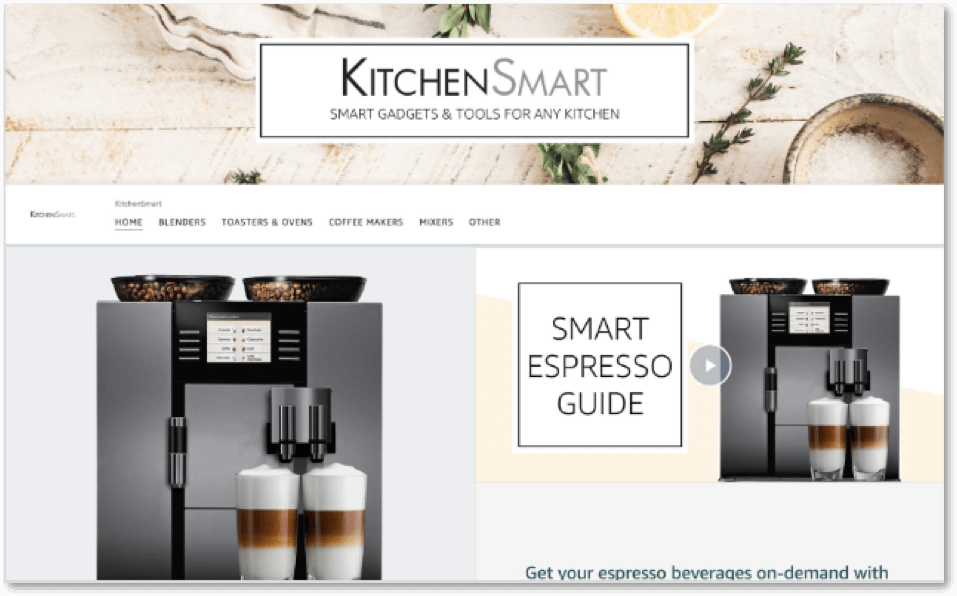
1. Showcase your products and brand story.
You can help shoppers to locate your product portfolio and its related items on Amazon easily.
Here is a good example of it:
2. Design your brand store the way you want. No coding skills are required.
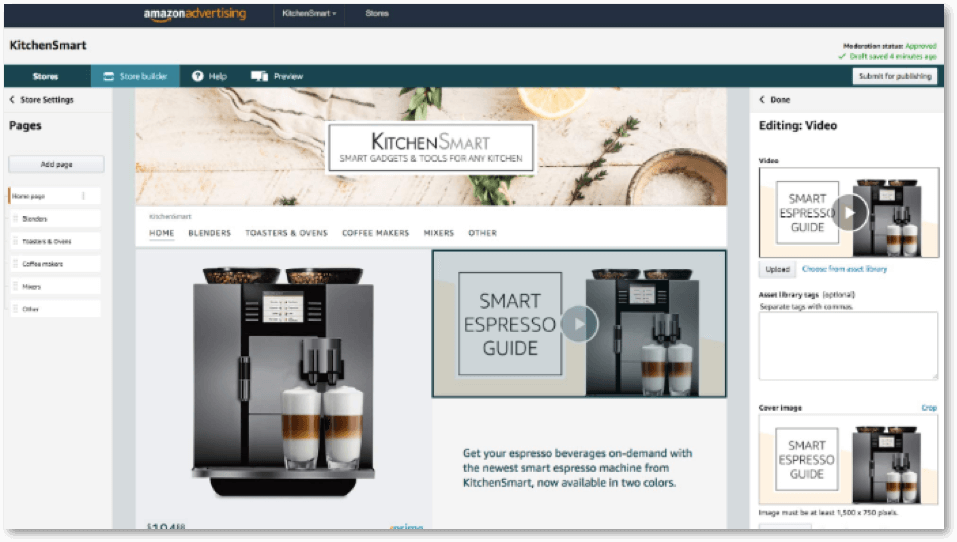
With the help of pre-designed templates or drag-and-drop tiles, you can create a fully customized, enriched, and multi-page store, without coding skills.
3. Get your own web address on amazon.com.

You can drive shoppers to visit your Amazon Store via ads and other marketing activities outside Amazon by using an easy-to-remember and unique Amazon URL.
4. Utilize Store Insights for optimizing your ad campaigns.
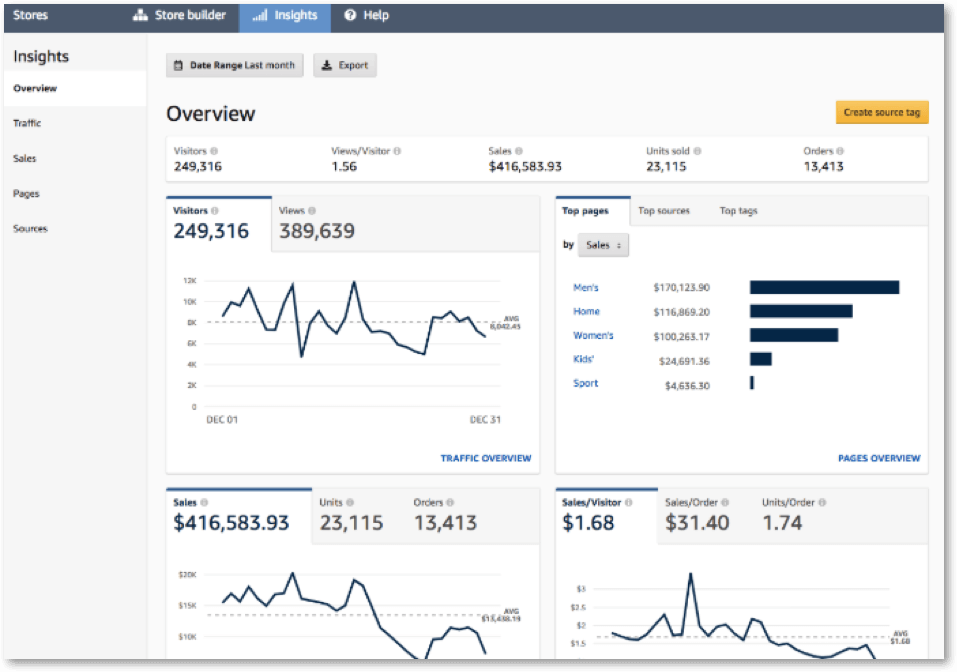
Insights give you a clear understanding of your Amazon Store’s traffic sources and sales. When you have these metrics, you will know how to perform better and excel in them.
How Do Amazon Stores Look Like?
Amazon Store has multiple pages and every page comprises a header & footer surrounded by different content tiles.
The picture shown below is an example of how your products can look on the Amazon Store.
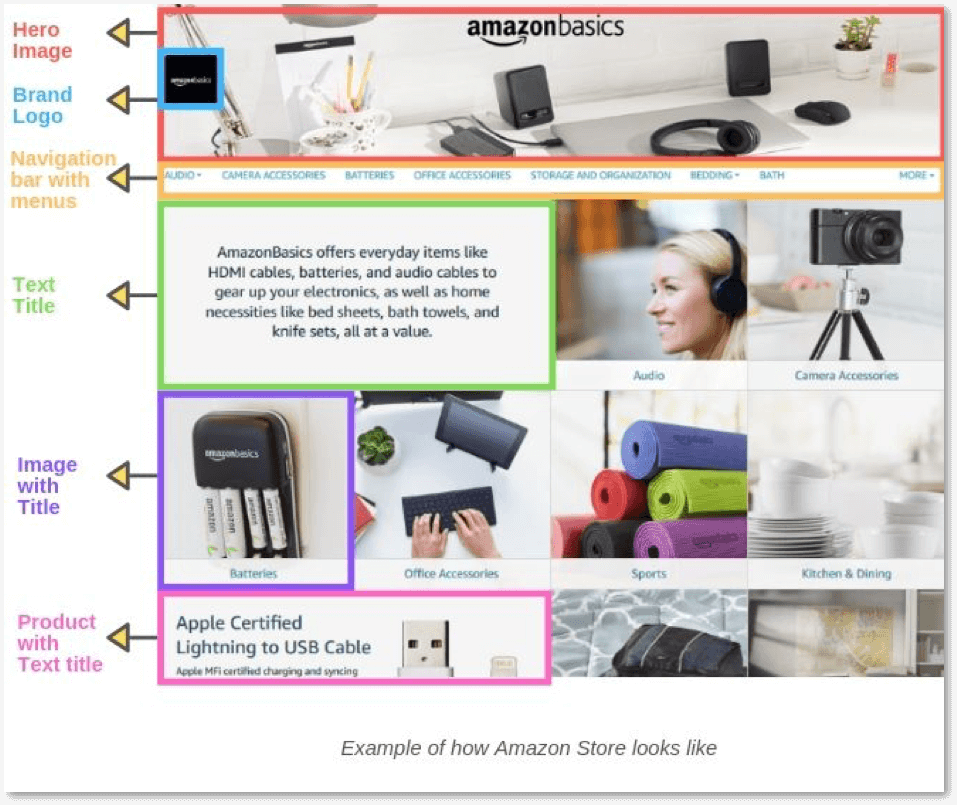
Every Amazon Store can have up to 3 levels with various pages at every level.
Note: When you drive traffic to any new storefront page through Headline Search Ads, you can easily send shoppers to your home tab or any other category directly. Every page includes a unique link or URL.
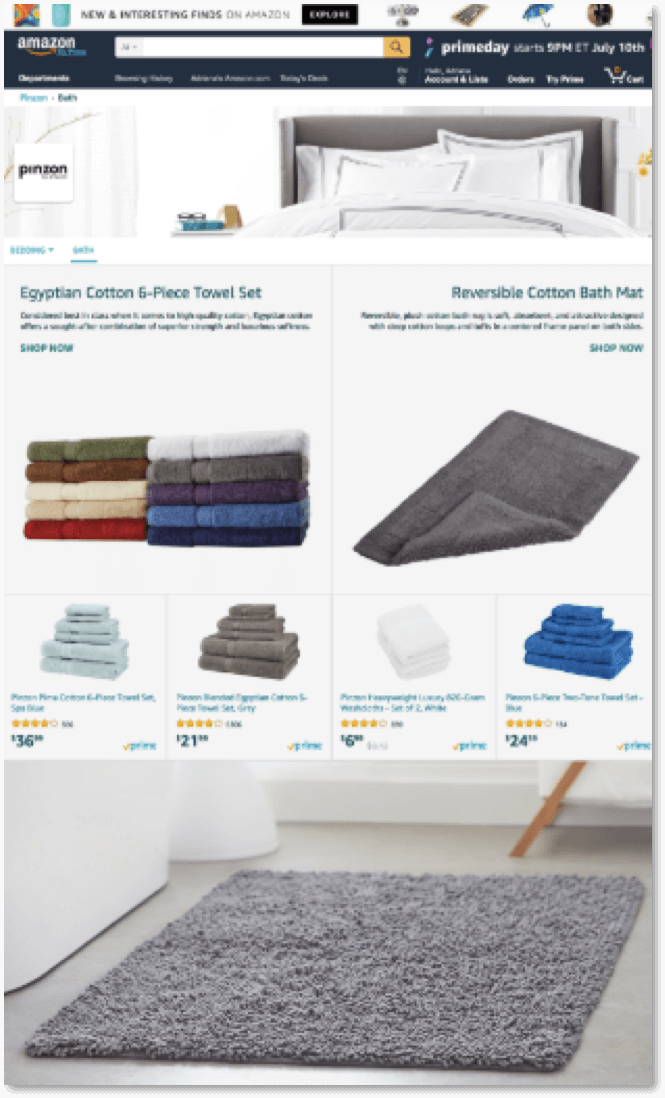
Amazon Store enables you to select from 3 different templates (which are default tiles):
- Product Grid
- Highlight
- Marquee
Amazon Store Manager involves 4 sections:
- Page Manager: This allows you to select, move, create, and delete the pages from Amazon Store.
- Tile Manager: This allows you to add, move, edit, and delete the tiles from Amazon Store.
- Preview Window: This shows how your current page looks like when it is life.
- Status Bar: Gives the Amazon Store’s current moderation status and shows the error messages.
How To Create An Amazon Store?
Creating an Amazon Storefront is not a simple task but also free, given that you are had enrolled with the Amazon Brand Registry program.
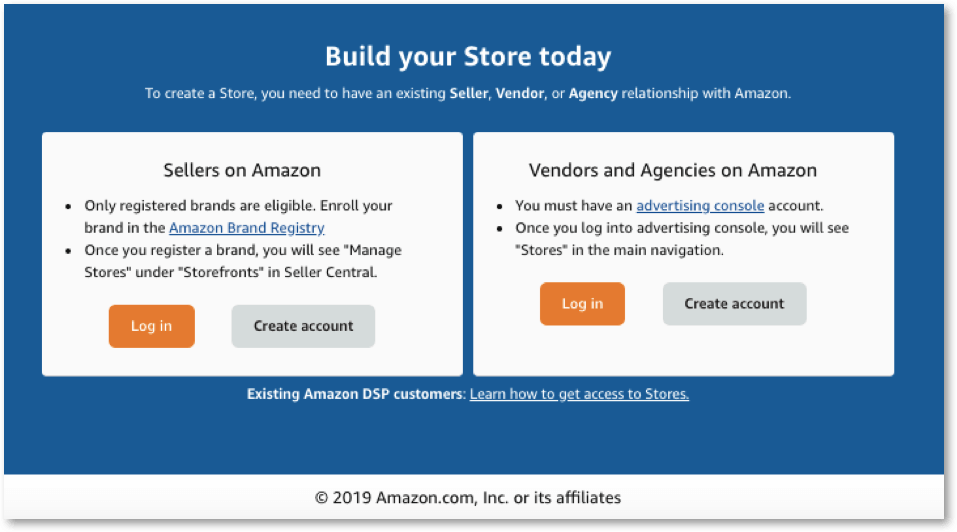
Here is the step-by-step process to set up an Amazon Store:
Step 1: Create a professional seller account
Everything begins by signing up for a professional seller account. Once you give your basic details like name, password, email address, payment information, and business contact details, Amazon allows you to pick the web store items and buy your online store.
To ensure that you are a real or legitimate business, Amazon will verify by calling you on the business contact number that you have provided. Therefore, always double-check if you have typed everything correctly.
Amazon is selective when it comes to the approval process and letting you sell on its marketplace. It has strict documentation and verification requirements. This protects the sellers and the customers by removing counterfeiters as well as sellers who try to manipulate organic rankings with several accounts.
To create a professional seller account, these details are required:
- Your name (as per the income tax return)
- Your full address
- Your contact number
- Your email address
- Your business structure type (Limited Liability Company partnership, sole proprietor, corporation)
- Registration state
- Your FTI (Federal Tax Identification) number
For identity verification, you need to keep these handy:
- First & last name
- DOB (Date of Birth)
- Government-issued ID like driving license number
- Country of issue
- A high-quality image of the front and back part of your ID
- Your bank account statement
For fee:
- You need to give your credit card details so that Amazon uses it to charge your monthly fee, which is $39.99.
For payment:
- You need a U.S. bank account number
Step 2: Register with Amazon Brand Registry
Now, once Amazon approves your professional selling account, the next step to create an Amazon Store is to apply for ABR (Amazon Brand Registry) program.
The ABR program offers different tools to guard and improve your brand on Amazon. This also includes:
- Professional presentations
- Access to even the “gated or restricted” selling categories
- Enhanced marketing & advertising features
Note: Brand Registry tools aren’t accessible to resellers.
So, once you register your brand, you can create enhanced content for every product page like lifestyle images, brand messaging, and many other assets.
Remember that only a registered brand can control all its product pages. The Brand Services of Amazon will help eliminate counterfeit sellers/sellers who disobey your brand’s trademark.
Though a tool like Brand Analytics provides detailed insights and metrics on Amazon’s shoppers, one of the primary benefits of Brand Registry is its ability to create a branded storefront.
To apply for the ABR program, you need to provide these details:
- Your brand name, as registered with the United States Patent & Trademark Office
- Your brand’s serial number (USPTO registered)
- List of countries where your products are manufactured as well as distributed
- Your brand name’s image on your product
- Your product label image
- Your product image(s)
Step 3: Create your store’s homepage with an appropriate template
Once your brand is registered with ABR (Amazon Brand Registry), login to your Seller Central account or from Ad Console, go to Stores > Manage Stores.

Once you do this, you will be shown a list of your brands that qualify for a Store creation.
Choose from the list and follow the additional steps that Amazon prompts you to do. This mainly includes designing your homepage by choosing a template.
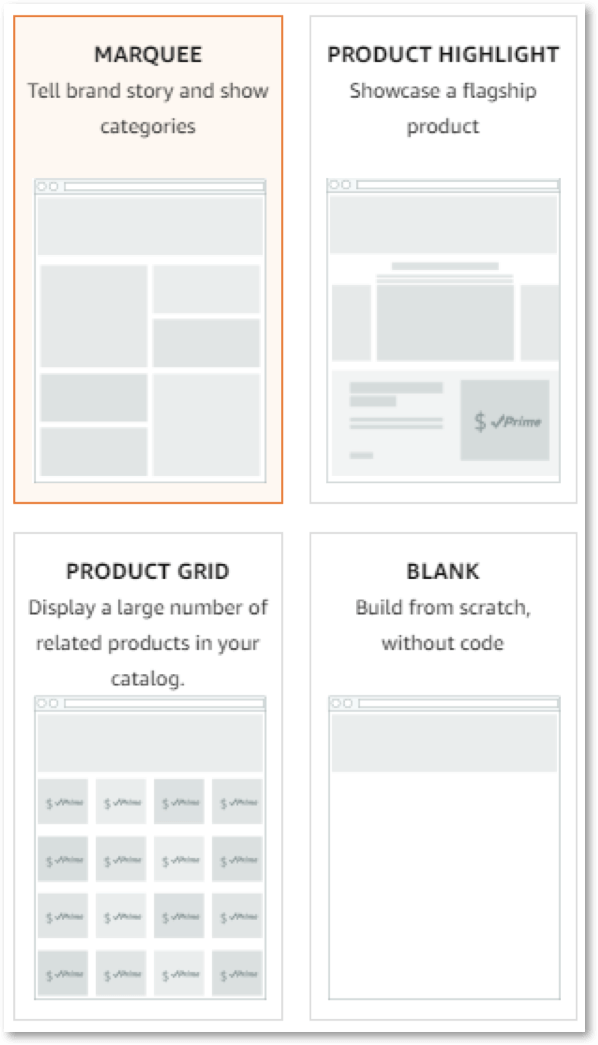
Amazon will show you four different themes to choose from. Pick the right one based on your business needs.
Step 4: Build your store pages
After you establish your store’s homepage, it is time to create additional pages depending on your best-selling products, catalog categories, deals, discounts, and more.
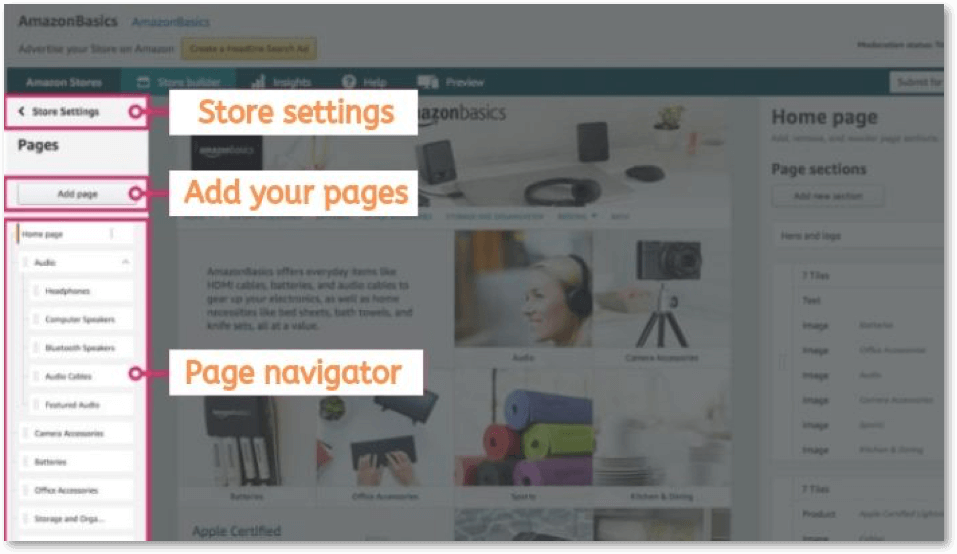
You should build your store pages much similar to the one if you had your own eCommerce website.
Pay attention to even the tiniest detail while building the page. Ensure that the navigation is easy enough for shoppers to find exactly what they are looking for without much effort. A convenient shopping experience is key here. So, make sure that your pages are designed that way.
Step 5: Add the content tiles to every page
Once you have established a proper hierarchy of your pages (keep in mind that they should be customer-friendly with easy navigation), the next step is to add content tiles to every page.
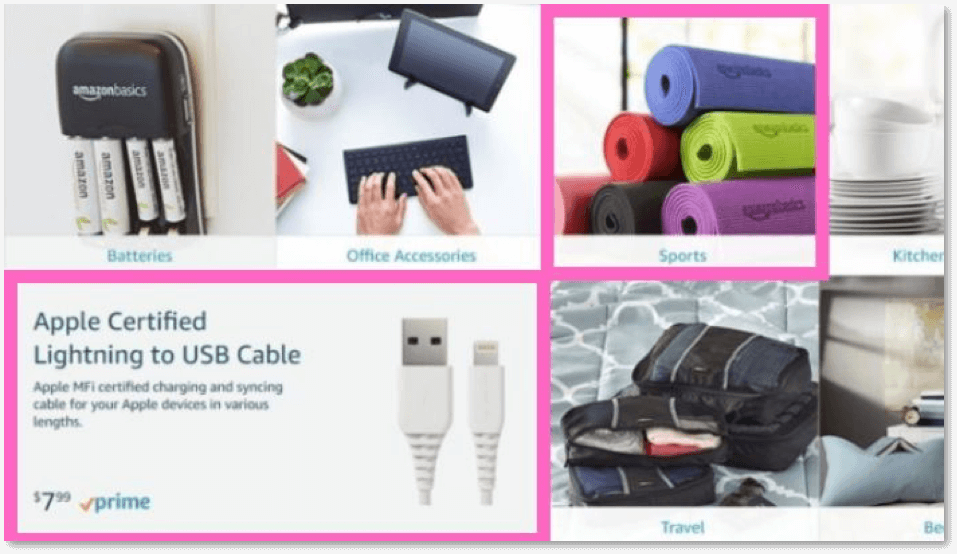
So, content tiles are basically the content that a customer can interact with on every page of your store. These include:
- Images
- Titles
- Product grids (example: bestsellers)
- Galleries
- Video
- Navigation
Step 7: Upload your products
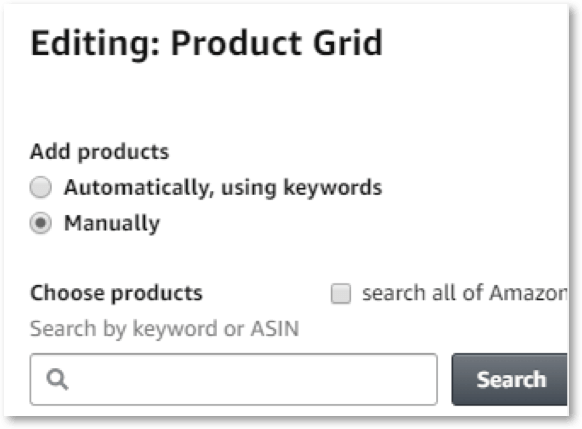
Once you have the design layout of various pages ready, it is time to add your products. In each store, there is a product inventory, a wide collection of items for buyers to pick from.
So, your store is no exception. You will also have to stock your store with items that you want to sell.
However, unlike other stores, the perk over here is that you can upload your entire product inventory in one go.
You just have to assign ASINs (Amazon Standard Identification Number) or UPC Codes to every product. Then, it is only a matter of copy and paste.
Recommended guide: How to update UPC on Amazon.
Amazon makes this task straightforward because you can easily search the ASINs that you are selling on their Marketplace already.
Step 8: Submit your created store pages for review and then, publish
After you have designed all your pages properly, you do a quick review of them so that there aren’t mistakes. Click on the Store Preview option to check how your designed page is like.
Check for:
- Grammatical errors
- Spelling mistakes
- Branding or image inconsistencies
- Issues with navigation, product images, and content tiles
Now, submit the created pages to Amazon so that they can review them.
What metrics can you see through “Amazon’s Store Insights”?
Amazon Store Insights offers clear metrics related to your products, which include:
- Daily visitors: This is the total number of unique devices or users who viewed your store page(s) in a day.
- Views: This is the number of views that a page received during a specific time period. However, this also includes repeated views.
- Views or Visitor: This is the number of unique pages (on average) viewed by a visitor on a daily basis.
- Sales: This is the total estimated sales that your products received from the visitors within 14 days of their last visit.
- Units sold: This is the total estimated units that store visitors bought within 14 days of their last visit.
Tip: Use the brand analytics tool from your Store’s main page.
Apart from the metrics mentioned above, there are 4 other sources of traffic that Amazon also measures, which include:
- Organic Traffic: This refers to the traffic that you get within Amazon such as the brand’s detailed page links or search results (by ranking on page #1 of the Amazon results page).
- Traffic from Headline Search Ads: This is the traffic that your store pages receive through headline ads.
- Tagged Sources: This is the traffic that is tracked via custom source tags. You can create your source tags for multiple traffic channels.
- Others: Other sources of traffic that aren’t categorized.
To get a more detailed view of how to create an Amazon storefront, check out this video:
Additional Tips:
1. Use the Brand Analytics tool to measure your sales performance
Once you have published your branded storefront, you can start using the Brand Analytics tool to measure your performance.
Many resellers & brands tend to buy third-party tools to gain insights into Amazon’s conversions, sales, search terms, and other different metrics.
But the problem with those tools is that besides paying so much, they fail to give you the exact data. They are rather “estimates,” and not actual data.
On the other hand, Brand Analytics is a tool from Amazon, which is exclusively designed to provide real data to all registered brands. It shows the information on:
- Top keywords or search terms that can help you get more conversions for respective products & categories.
- Keywords of your competitors’ products.
Also, you can see the metrics of the top-performing keywords along with the top 3 items, which have converted to sales for every search term. Now, this is an important piece of information, which no third-party tool will be able to give.
It enables brands to know the exact keywords that customers are searching for and which can convert into more sales.
Brands can leverage this information to optimize their product pages as well as build better and creative ads.
Besides this, Brand Analytics provides data for product comparisons. It also shows the items that potential buyers compared to yours, and further shows if a compared product made a conversion.
This is brilliant information to build targeted ads and analyze your competitor’s ads. Undeniably, customer demographics (gender, income, age, education level, etc.) is one of the most vital data because it gives a 360° view of your product’s performance.
These details help brands to comprehend their customers better, which is important for targeting ads both on & off Amazon.
2. Target Amazon Ads to increase your product sales
Ads are one of the ideal ways to enhance your product sales. With an enhanced ad platform, anyone can give an ad on Amazon but the question is how optimized the ad is, to create better sales?
3. Highlight your products and reflect your brand’s story
It is important to follow a few best practices educating, helping, and inspiring potential shoppers to locate your brand as well as your products.
Recommended read: How Does Amazon Inspire Work?
- When it comes to your Store’s messaging, visual identity, and tone – be consistent.
- Use engaging and rich content to highlight brand differentiators.
- Make sure that your Store’s navigation can be easily explored and discovered.
How To Get The Most Out Of An Amazon Store?
These are a few tips that are important to make the most out of Amazon Stores:
Customize your store’s space
Just like no individuals are the same, no two stores can be the same— so, design yours creatively and make sure that the layout you design suits your brand.
Once you have set up your branded storefront, it is time to share it with your customers through a unique store URL (which is: https://www.amazon.com/your-brand).
Note that Amazon’s Store Builder tool helps brand owners to build their stores in a few minutes and get them live in 72 hours.
While designing, make sure that the design is simple and has easy navigation.
Use various templates for product categories, featured products such as new releases or top sellers, and sub-brands. Include impressive multimedia content to add colors to your brand.
Recommended guide: Step-by-step process to close your Amazon Seller account.
Amazon Store offers you 3 preset templates to choose from. So, pick wisely and customize smartly.
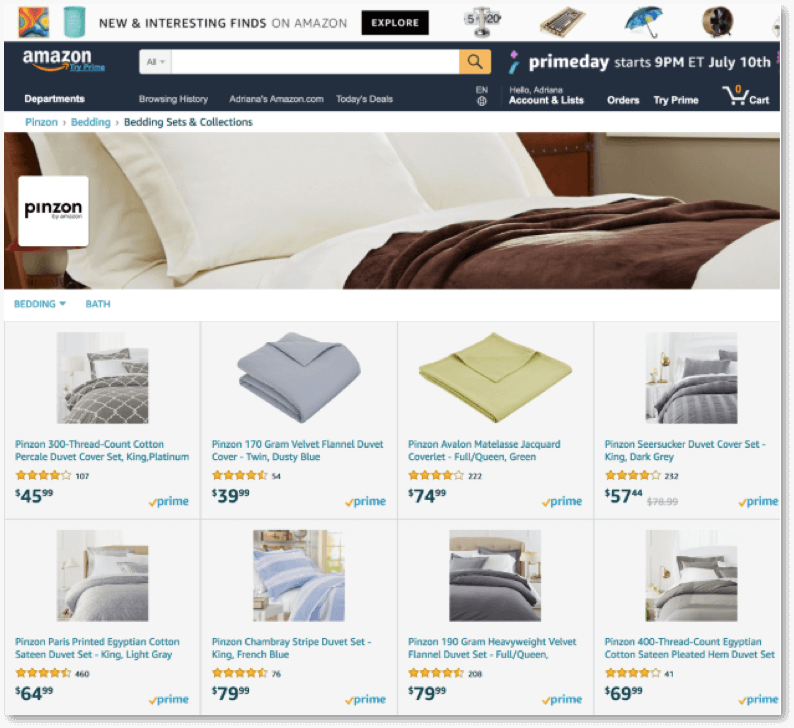
1. Product Grid
This design template is a great way to showcase your product collection in a grid format.
2. Marquee
This is more like a curated item display with some extra space for imagery and text such as customer quotes and product descriptions.
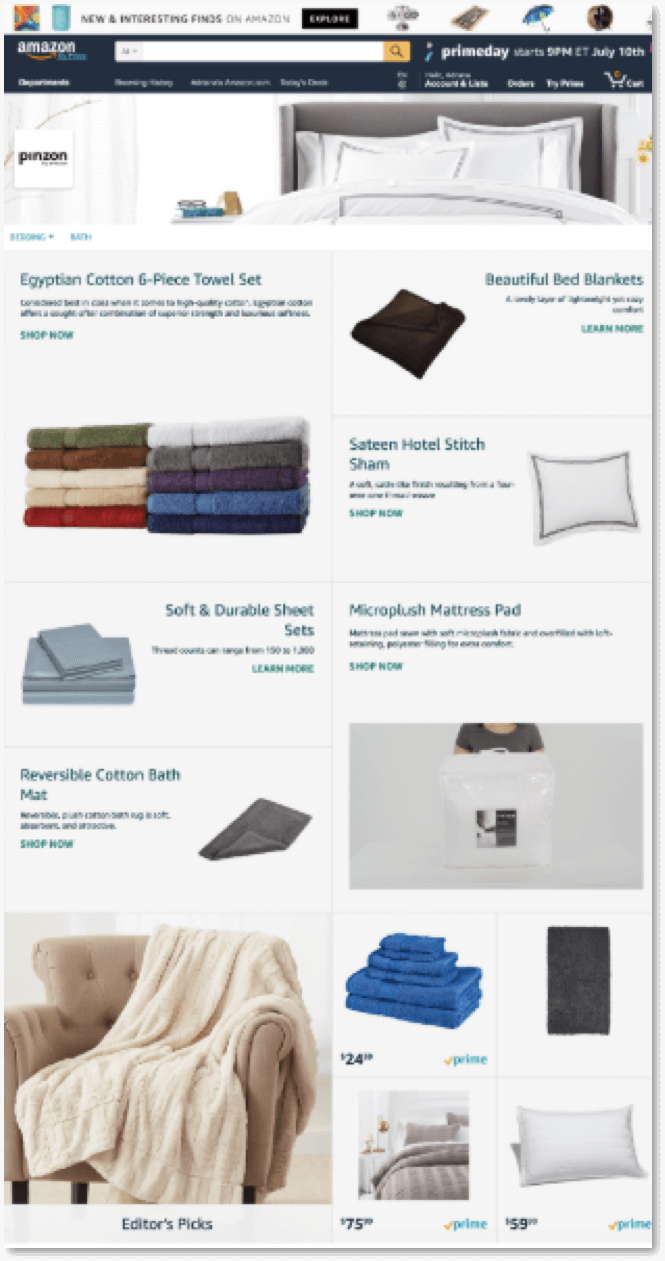
3. Showcase
This design template type is great for brands who want that flexibility for creating a content-rich experience. It not only enables brands to feature their wide range of collections but also provides a good amount of space to feed the product information along with visual content.
Curate a proper shopping experience for the customers
One of the best things about Amazon Stores is that brands can handpick their product listings or utilize dynamic widgets to auto-populate various product displays depending on the shopper insights (individual) like:
- Best-selling product
- Keyword search
- Recommendation history

Note that these widgets update your store’s pages automatically whenever you add a new listing.
Promote your store pages both on & off Amazon
Come up with an effective marketing strategy so that you can boost engagement and brand awareness for your store.
Here’s what you can do:
- Leverage Headline Search Ads (noticeable ad placements that appear above the search results) to promote your store products to a qualified audience.
- Include a unique store link on all your marketing activities – both on & off Amazon.
- Make sure to link your branded store on the product’s detail pages.
- Share your store’s link on all your social media channels.
- Use inbuilt reporting tools to optimize and measure your store performance for a higher number of views.
Other FAQs (Frequently Asked Questions)
Here are a few other important questions related to “stores” to make a note of:
1. Is creating an Amazon Store free?
Yes. Creating an Amazon store is free and does not require programming skills. It is a great way to display your brand as well as your products. You can easily create a customized layout in minutes with rich multimedia content with the help of pre-designed templates and a drag & drop facility.
2. Where does a store appear?
Stores show up on the Amazon website, Amazon mobile app, and desktop.
3. Who can create a store?
The option of Amazon Store is available only to brand owners, agencies, and vendors, who are registered with ABR (Amazon Brand Registry) program and who sell their products on Amazon.
Amazon DSP sellers can also build a Store. However, they should have an advertising account apart from their Amazon DSP account.
4. How to enroll my brand?
To create an Amazon Store, you must have an active & registered trademark, which should be submitted as well as approved by Amazon. To enroll your brand, look at the page on Amazon Brand Registry.
Note: Only sellers should enroll in the Amazon Brand Registry program—vendors don’t have to enroll.
5. How to measure my store’s performance?
The Stores insights give you detailed information about your store’s daily & aggregate views. However, you can always use the Brand Analytics tool to see complete data.
6. How long does it take to create an Amazon Store?
Note that the time to build your Store depends entirely on:
- Your business requirements
- What you want to create
- How you want to showcase your collection
Amazon provides different preset design templates & tiles to make things easier. Creating them is quick and doesn’t require you to write any code.
Once you have all things set up and ready to publish, you will have to submit it to Amazon for a review and approval process.
Amazon reviews your created Store before you can Go Live. They do this to ensure to maintain high standards and ensure that customer experiences convenience while shopping.
The review process takes a maximum of 72 hours. During this process, your store can be approved or rejected.
If your Store is rejected, it means that it has failed to meet its content acceptance policy.
7. Do Stores display on all devices?
Yes. The Store widgets and templates are built with a responsive design, meaning that they can adapt to any device type and screen size.
Conclusion
With the help of Stores, customers on Amazon can unveil and learn about different brands and their wide range of products. Stores allow brands to have a dedicated and rich shopping experience that engages customers. With metrics about traffic, sales, and engagement levels, brands can progress their growth over time.
Additional Read:
What are the most popular items to sell on Amazon?
eCommerce Help Desk: What Is It and Do You Need One?
How to Sell Alibaba Products on Amazon.
How to contact Amazon Seller Support?




Prabs
May 20, 2021Thank you for being so supportive and insightful!!
Arishekar N
June 15, 2021Glad to know.
Madison
May 24, 2021Great Post!!
Arishekar N
June 15, 2021Thank you.
Sherley Romm
November 26, 2022Your guidelines on how to use custom graphics, videos, and audio to make the store more engaging are spot on. Thanks for sharing.
Arishekar N
January 17, 2023Thank you for your feedback.
Dave Sheehan
December 12, 2022Excellent post! Your explanation of the benefits of creating a branded store and the different ways to customize your store front was particularly enlightening.
Arishekar N
January 17, 2023Thank you for sharing your thoughts. Your comments always add to the conversation.